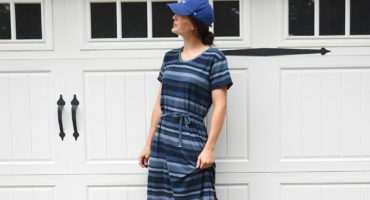
We have a special guest today who is a dear friend and a talented seamstress. Leslie of Threadbear Garments is sharing her maxi hack, and I can’t wait to make one or three of my own. I’ll let her give you all the details – we hope you enjoy! Leslie’s Pixie Tee Maxi Tutorial I’m
I am so excited to have a special guest posting on the Chalk and Notch blog today! Meg of MEGMADE Sewing is sharing the changes she made to make the Pixie Tee maternity friendly. I’ll let her give you all the details – we hope you enjoy! Meg’s Pixie Tee Maternity Tutorial Meg of MEGMADE
This is my favorite post to put together! It’s so fun to see all of these Pixie Tees in one place. I am sending out a HUGE thank you to the 42 testers who volunteered their time and put so much effort into making the Pixie Tee pattern a reality. They offer honest opinions and detailed feedback, and
Thank you all so much for the warm reception of the Pixie Tee pattern! Many of you will have received the Pixie Tee for free if you signed up for the Chalk and Notch Newsletter by June 24th. We hope you enjoy not only this pattern but also the new tutorial layout for Chalk and Notch Patterns.
EDIT: We have updated the Pixie & added a Mini Pixie pattern. You can check out the updated pattern release post here. It’s release day for the Pixie Tee and I am also debuting a new pattern tutorial layout! I asked for your feedback in a recent survey to help me bring you pattern tutorials
This probably seems like the most intimidating step, but it comes together pretty quickly and it’s really cool. Pulling the jacket right side out feels like magic! By the end of this post, you will have made your very own Joy Jacket! SEW THE MAIN FABRIC TO THE LINING/FACING Lay the lining/facing right side up.
This post is all about adding the hardware. Don’t let that word scare you, I promise it’s not hard! PREP ZIPPER TABS & ATTACH ZIPPER Prep the zipper by folding back the tabs at an angle and sew them in place. This will move the excess tab fabric out of the way when inserting your