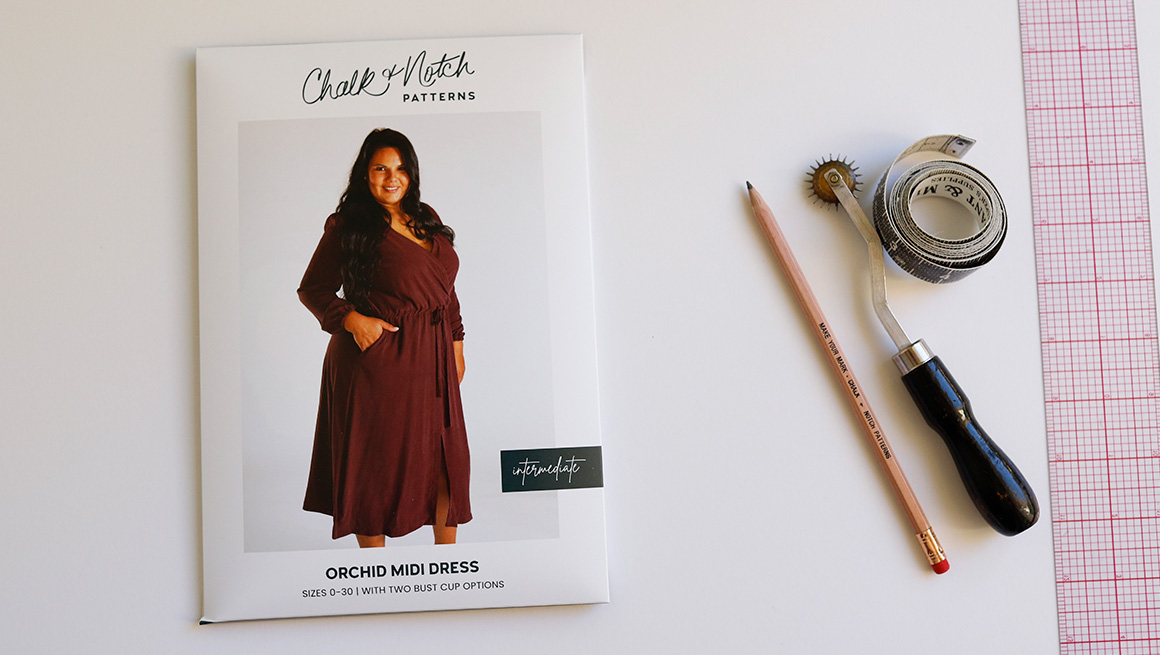
I hope you are excited as I am about the new updates for the Orchid Midi pattern! There are three new sizes: 20/22/24 and a new bust cup: C/D, which is a built-in Full Bust Adjustment. My hope is that these changes will help more people make the Orchid Midi pattern with fewer adjustments. Basic custom adjustments are included in the pattern (some are listed below), but I wanted to have a separate post with more details to give you the confidence to make custom adjustments if you need them. I wrote a similar post for the Fringe Pattern; you can find that fitting post here.

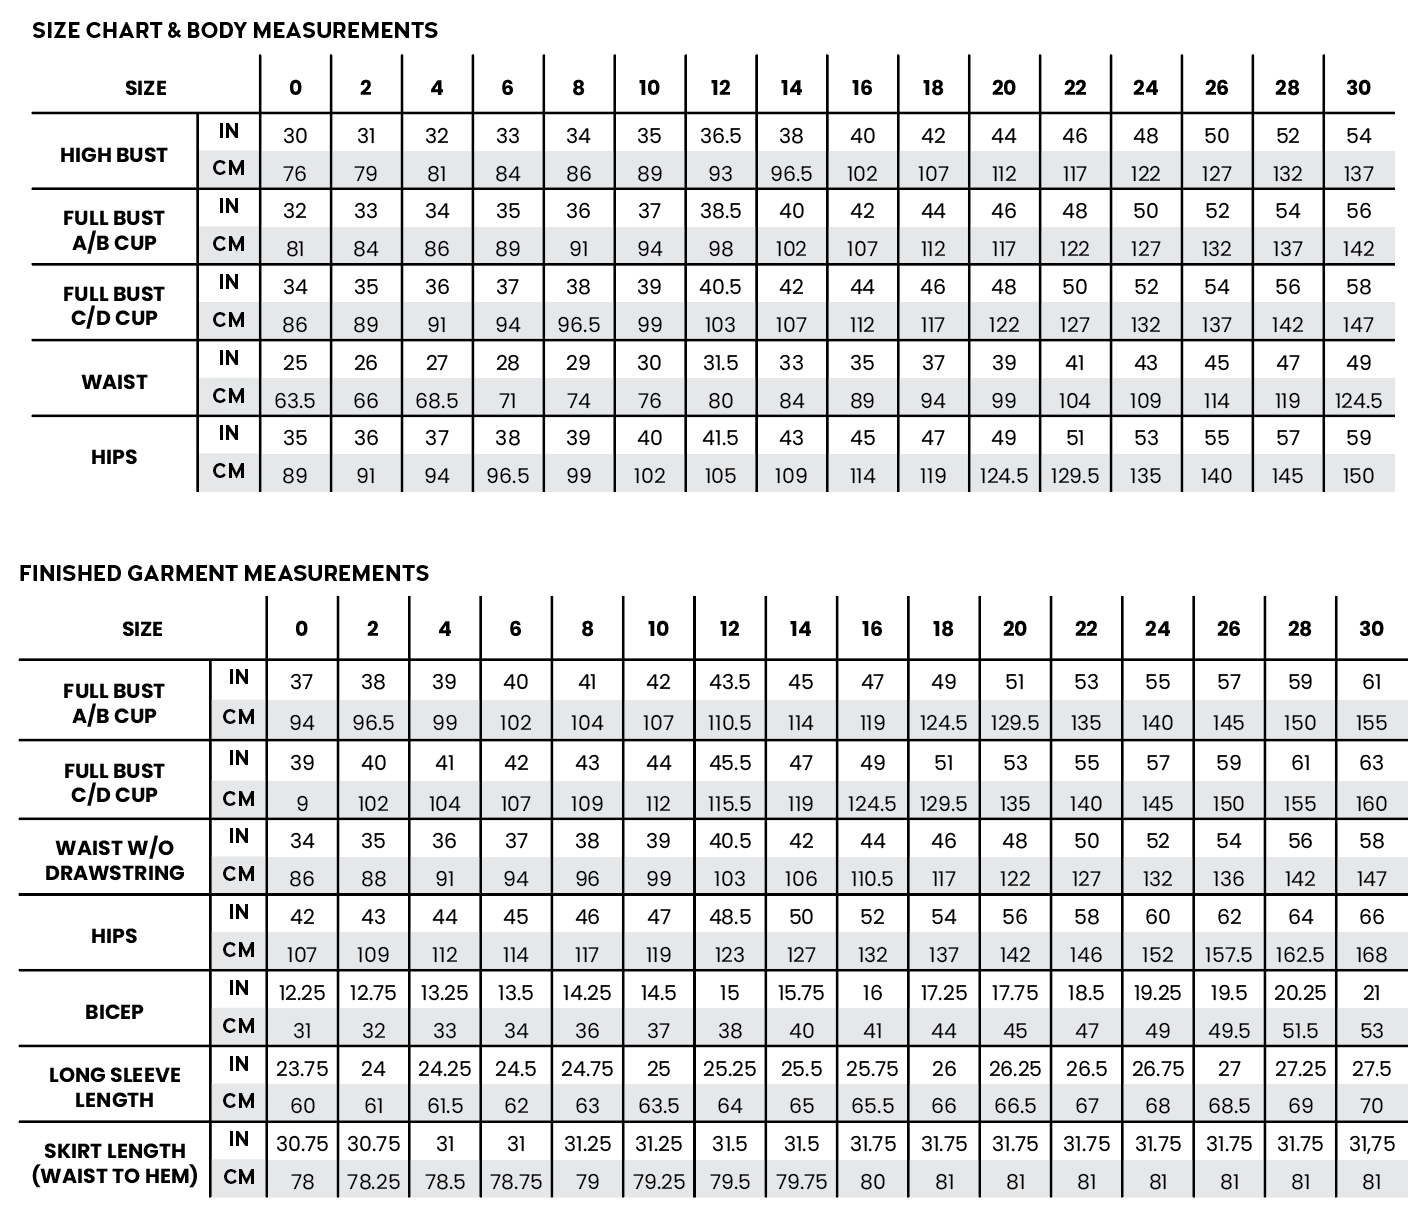
SIZE CHARTS
You have heard me say this before, but the truth is that no pattern will fit every body type and it’s very common to need to make custom adjustments. Read through the size chart to familiarize yourself with Chalk and Notch sizing and the intended ease for the Orchid. Please don’t be discouraged if you need to make a few adjustments or blend sizes; most people make adjustments. Also, remember that the goal should be to create a comfortable garment that you will enjoy wearing. I don’t think it’s important to get rid of every single drag line and pull, so be kind to yourself as you are analyzing your fit. If you have any specific questions, you can always reach out in our Chalk and Notch Facebook Group or email me directly here.
MAKING A MUSLIN
I will always advise you to make a muslin or toile (test garment) before cutting into your final fashion fabric. You can muslin your Orchid Midi omitting the sleeves in order to check the fit of the bodice and length. However, since the Orchid Midi is designed to have the waist cinched, you will not see the actual wrap drape until the bodice is attached to the skirt. Fabric can also affect fit, and you won’t get a feel for the real fit unless you sew it in a comparable fabric.
CUSTOM ADJUSTMENTS
LENGTH ADJUSTMENTS
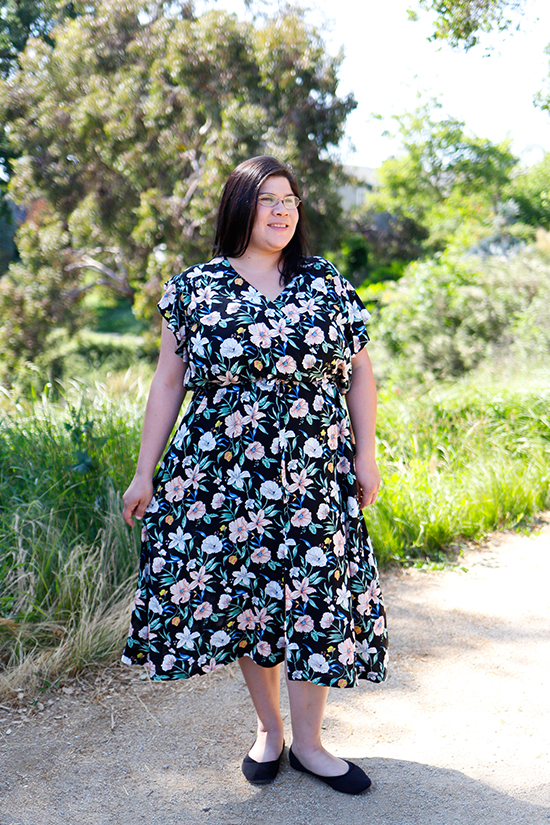
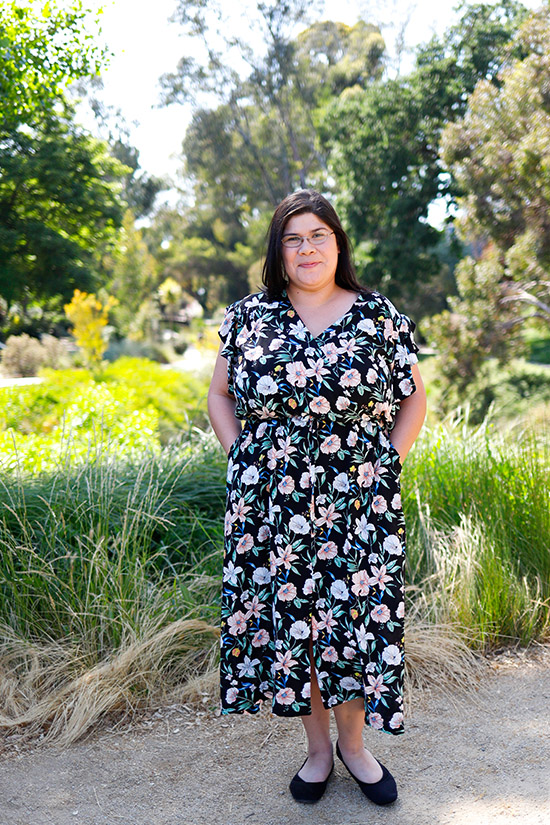
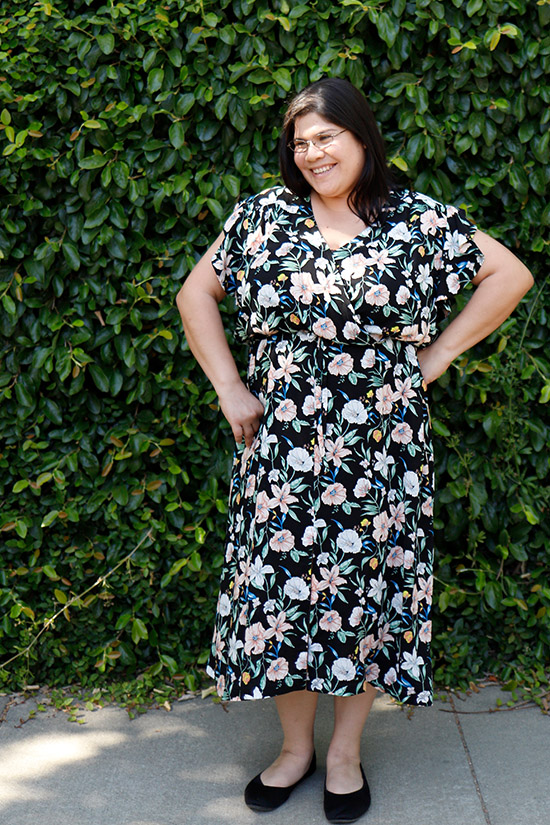
For reference, Chalk and Notch patterns are designed for a height of around 5’7″ (174 cm). My fit models, including Susanna pictured in this post, are all over 5’7″ (174 cm) but all patterns are tested on a range of heights. For reference, if you are around 5′ (152 cm) tall (like me), you may need to shorten the pattern by up to 3″ (7.5 cm) total, and if you are over 6′ (183 cm) tall, you may need to add 3″ (7.5 cm) of total length, but usually it’s not more than 3″ (7.5 cm) either way.
As I mentioned, I’m 5′ 1″ (155 cm) and here are two photos of me in the Orchid Midi. The one on the left is the original length through the bodice and the one on the right has been shortened by 3/4″ (2 cm) through the bodice. No adjustments were made the skirt length on these samples, but I could remove 1″ (2.5 cm) from each of the cut lines in the skirt, 2″ (5 cm) total.
Bodice Length Adjustments
The waistline is meant to hit at the natural waist with a blouse effect. You will want to make sure the bodice length is the correct length. The wrap will not have the correct amount of coverage if the bodice is too long. During testing many people under 5′ 7″ (174 cm) needed to remove 1/2″ (1.25 cm) – 1″ (2.5 cm) from the bodice length. Keep in mind that once the skirt is attached to the bodice, the waistline will be gathered with the drawstring. This is one of the main reasons to make a muslin or toile (test garment) for this style; it’s hard to know if you will need this adjustment without making a muslin first.
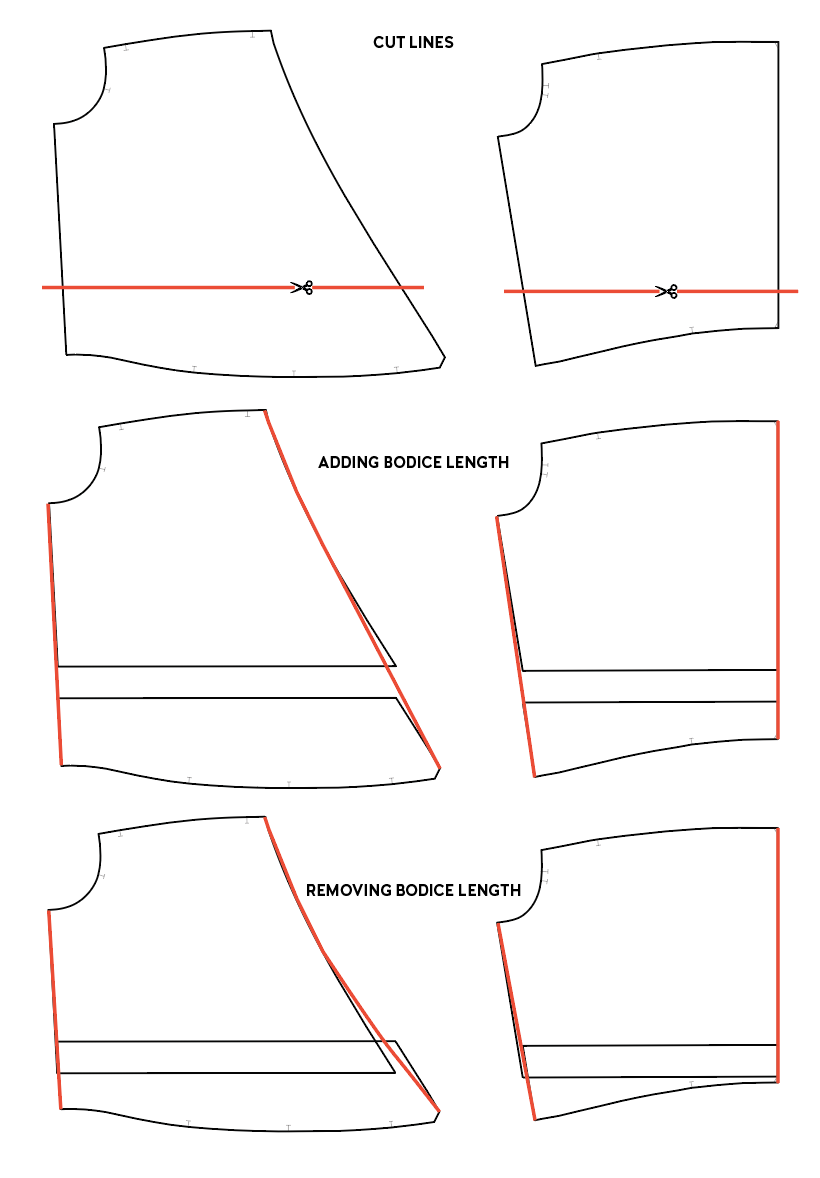
To adjust the Bodice Length:
- Cut the front and back bodice pattern pieces horizontally at the indicated line.
- If adding length, add paper and add the amount desired.
- If removing length to shorten, overlap at the cut line the amount desired.
- Re-draw the side seams, neckline and center back seam.
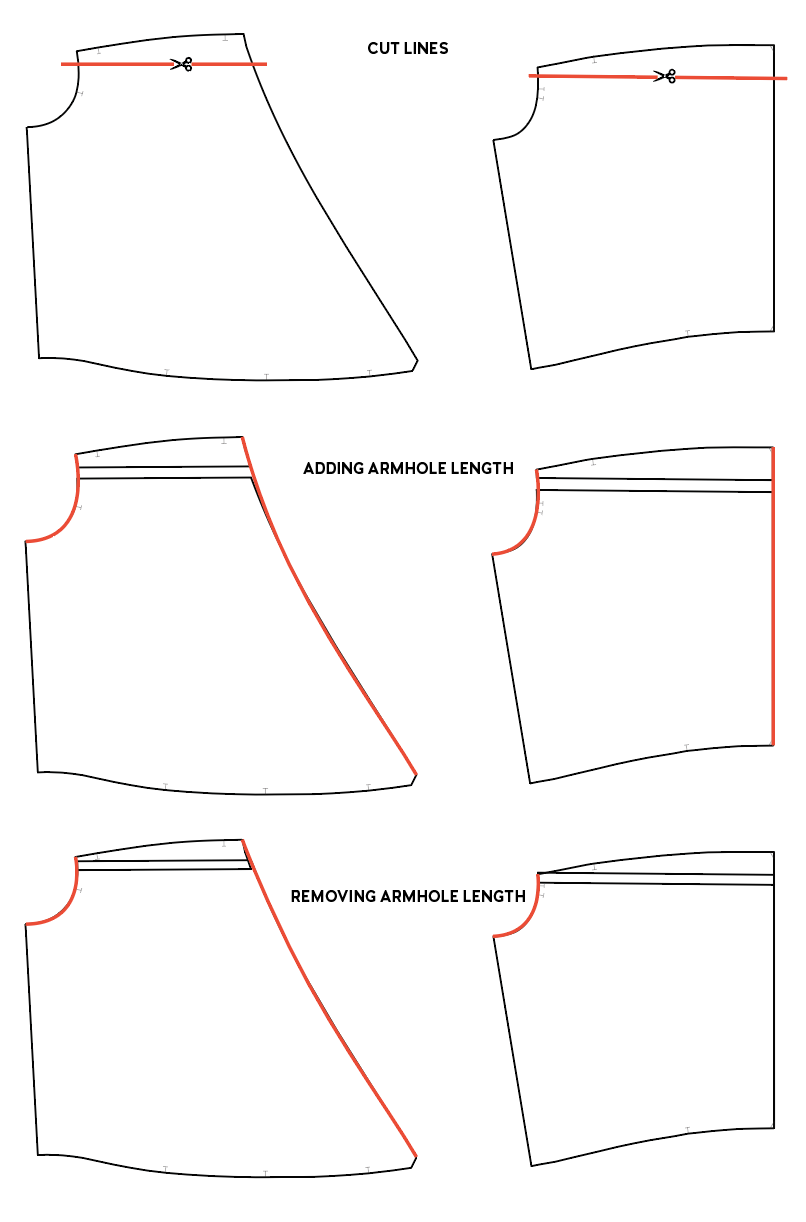
If you feel like the armhole is too high or low, you can adjust through the armhole at the yoke seam. You may need to adjust between 1/4″ (0.6 cm) – 1/2″ (1.25 cm).
To adjust the Armhole Length:
- Cut the front and back bodice pattern pieces horizontally at the indicated line.
- If adding armhole length, add paper and add the amount desired length.
- If removing length to shorten, overlap at the cut line the amount desired.
- Re-draw the seams on the armhole and neckline.
- Make the necessary adjustment to the long sleeve if sewing View B. Make sure to check your sew line length of your sleeve and armhole to make sure they still match.
- *If sewing View A (ruffle sleeve), you can use the same pattern piece and the overlap will be slightly different, but should be fine as long as you are not adjusting more than 1/2″ (1.25 cm).

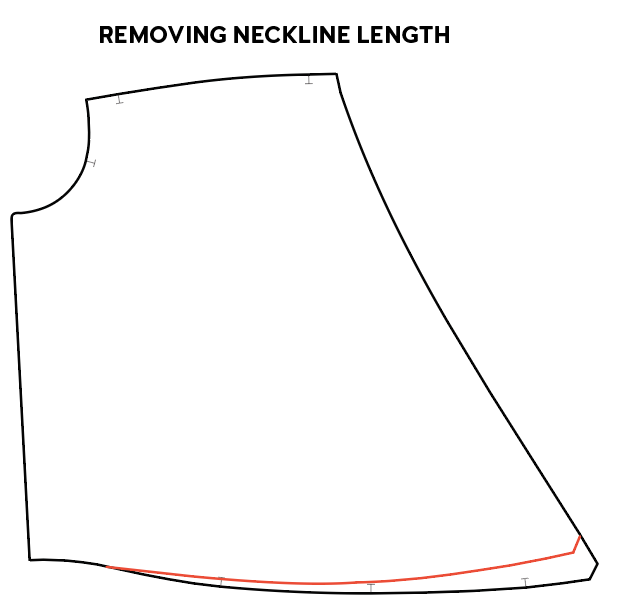
Instead of removing length through the entire bodice (or in addition to) you might also find that you need to adjust the length only through the neckline or the center back.
If you have extra length where the neckline meets the skirt, you might need to remove some length to keep the crossover close to your body. This is a common adjustment. I suggest baste stitching the bodice to the skirt (and not finishing the waistline seam) until you try on the dress and confirm the length is correct.
To adjust the just the Neckline Length:
- To shorten the center front neckline, remove length at the center front and trim to zero to the side seam.
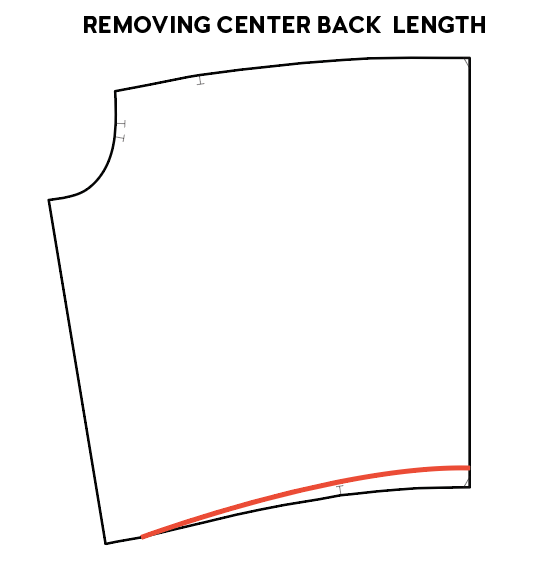
 Another length adjustment you might need is more of a sway back adjustment. This would be if you have too much bunching in the center back and you can remove length just in the back instead of shortening the entire bodice for a custom fit.
To adjust the Center Back Length:
- To shorten the center back, trim length at the center back and trim to zero to the side seam.
Skirt Length Adjustments
Midi length is designed to be mid-calf length. You may need to adjust the pattern, and you can refer to the skirt finished measurements to help you decide. Or you may prefer your skirt to hit higher or lower than mid-calf.
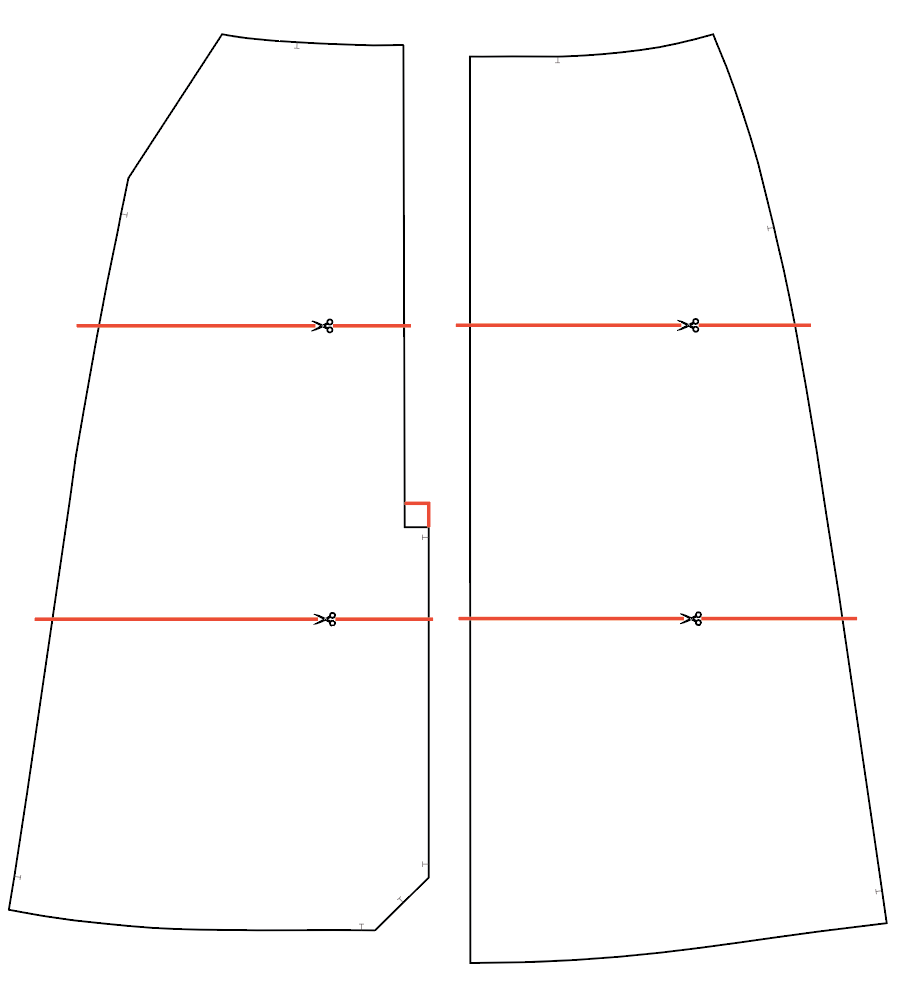
There are two lengthen/shorten lines on the dress skirt, and you can split the amount of your adjustment between the two. It’s easiest to adjust the skirt length before cutting since the mitered hem makes it tricky to adjust after cutting. You do not actually need the front slit to walk in this skirt, so you can omit the slit based on your personal preference.
To adjust the Skirt Length:
- Cut the front and back skirt pattern pieces horizontally at the indicated line/s.
- If adding length, add paper and add the amount desired.
- If shortening, overlap at the cut line the amount desired.
- Re-draw the side seams.
- Adjust the slit height by removing/adding length at the top of the slit.
BUST POINT & DART ADJUSTMENTS
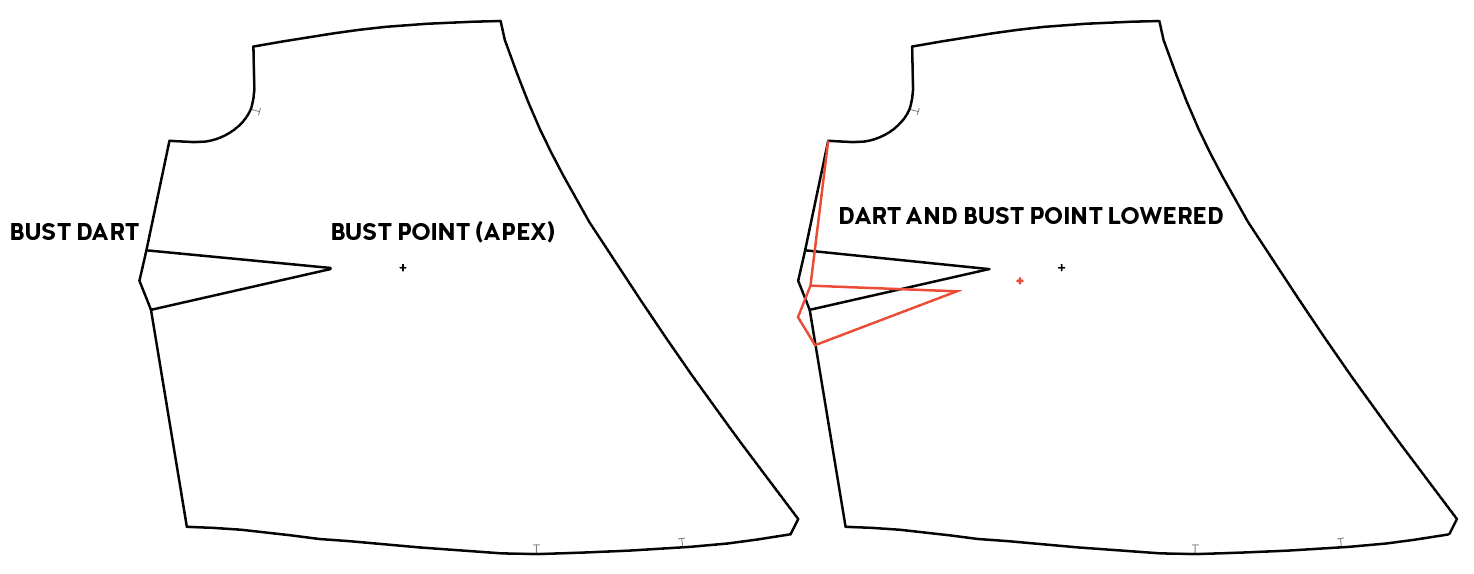
After you make any length adjustments, you’ll want to make sure the dart placement is accurate. The bust point (apex) is marked on the pattern and the bust darts should be about 2″ (5 cm) away on the C/D cup. This is “standard” but I always say there are no rules when custom fitting. You can easily redraw the dart points to be the distance from your bust that you prefer. This is an example of lowering the bust dart and bust point. Just make sure to true your dart and side seams.
BLENDING SIZES
Based on the amount of ease built into the pattern you may be able to get away without blending sizes. However, you can also decide to blend at the waist or hips for a more custom fit and to maintain the amount of intended ease.
To blend from a smaller size in the Bust to a larger size in the Waist:
- Print both sizes.
- Blend from the bust to the waist.
- Re-draw the side seams and neckline.
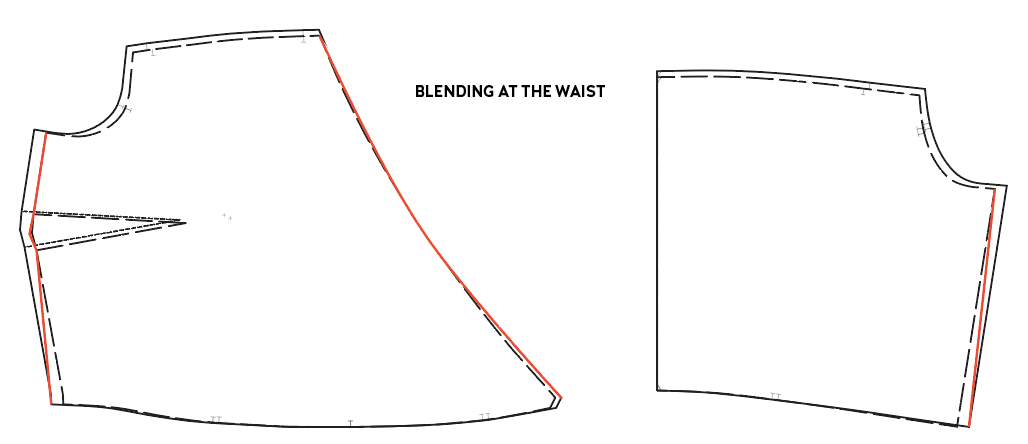
To blend from a smaller size in the Waist to a larger size in the Hips:
- Print both sizes.
- Blend from the waist to the hips (after the pockets).
- Re-draw the side seams.

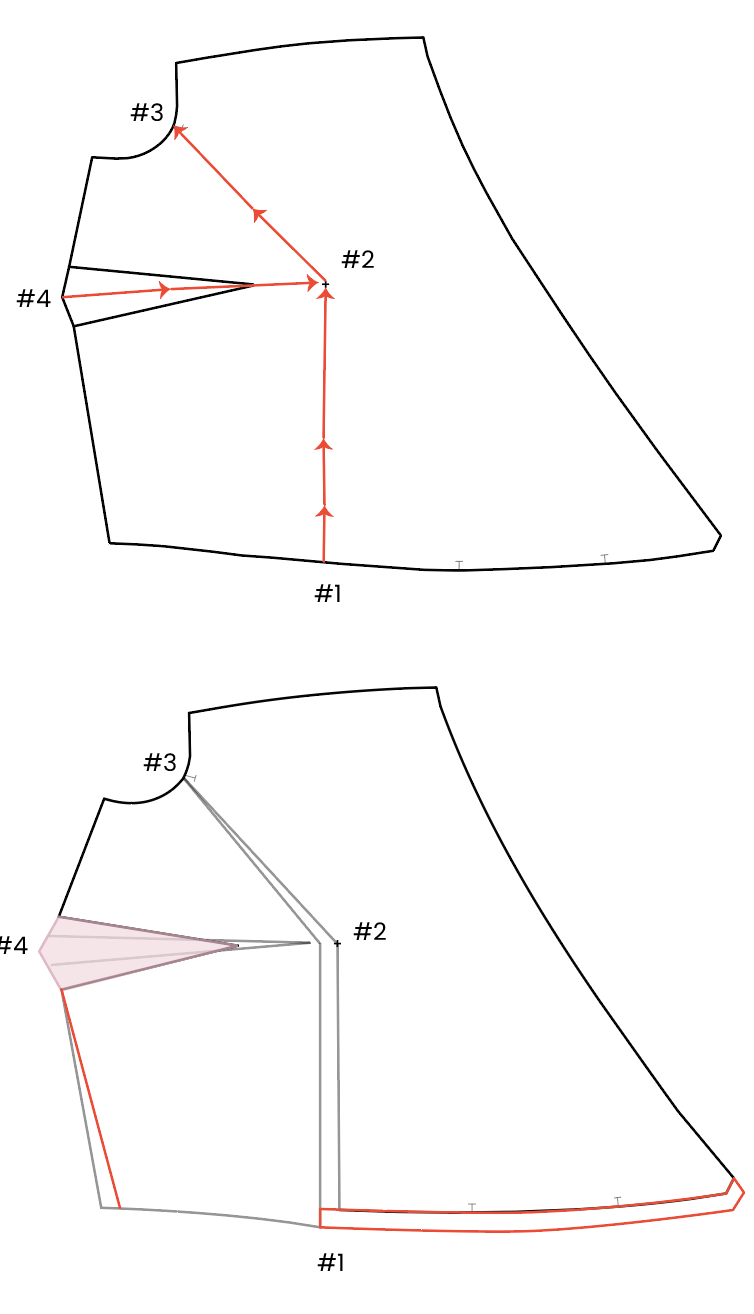
FULL BUST ADJUSTMENT
By adding a C/D cup we have created a built-in Full Bust Adjustment with 2″ more ease through the front bodice. If you have over 4” (10 cm) between your high bust and full bust, you may need to add a Full Bust Adjustment to the C/D Cup Bodice.
First, decide how much more ease you need through your bust. Add half that amount to your pattern. If you need 1” (2.5 cm) then you will add 1/2” (1.25 cm) to the pattern.
- Step 1: Cut from the waistline (#1) to the bust point (#2) then to the armhole (#3), not cutting all the way through at the armhole. Also cut from the center of the bust dart (#4) to the bust point (#2) without cutting all the way through at the bust point. Lay this on top of a new piece of paper.
- Step 2: Open the ease at the bust (#2), parallel to the hem (#1), shown in GREY. This will open ease at the points (#1 & #4), creating a larger bust dart and adding width to the waistline. Tape this new shape down on the paper.
- Step 3: Mark your new dart point 2” (5 cm) back from the bust point (#2). Draw the dart lines from this new point to the dart notches. True the dart, shown in PINK.
- Step 4: Take in the side seam, shown in RED, the same amount that was added at the waistline at #1.
- Step 5: The center front hem will now be shorter than the side front; add the missing length at the hem – shown in RED.
- Step 6: You have completed the FBA. Retrace the bodice.
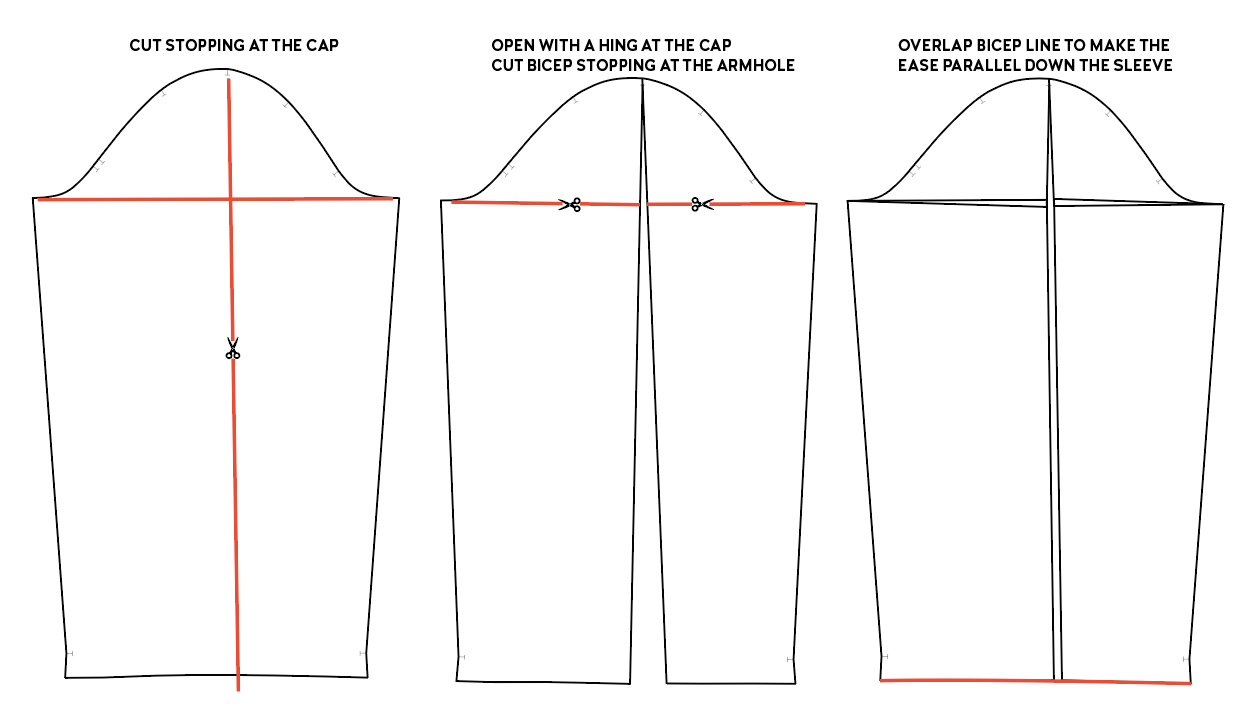
BICEP ADJUSTMENT
When sewing View B with the long sleeves, you will want to confirm you have enough ease. I have designed the sleeve to include 1.5″ (4 cm) of ease through the bicep. If you need more room, you can do a full bicep adjustment. In this example, I am adding more ease through the sleeve, not just the bicep. Since there is an elastic wrist cuff, you can add width without losing the shape of the wrist opening.
To add more width to the Bicep:
- Cut a line from the sleeve hem to the center cap notch. Stop to leave a hinge at the cap.
- Open the width, adding the amount needed at the bicep.
- Cut the bicep line, stopping to leave a hinge at the armhole.
- Overlap the bicep line to make the ease parallel down the center of the sleeve.
- Re-draw the hem seam.
SHOULDER WIDTH
The shoulder width should end close to your shoulder bone. If the width is too wide, you can trim off some of the width at the shoulder point. This is an adjustment Susanna could have used and one that I would do for her in the future.
Reduce the width of the Shoulders:
- Redraw the top of the armhole to come in at the shoulder point.
- Move the notch in.
- No need to really adjust the sleeves when making this adjustment. You can adjust the overlap the ruffle sleeves (View A) or the gathers in the sleeve cap (View B).

I hope this post helps explain how and when to do custom adjustments for the Orchid. It’s totally worth the time to make a muslin, make any adjustments and update your printed pattern. Remember to write down some notes for yourself so that when you come back to the pattern, you know what adjustments you have made.
XO, Gabriela
