
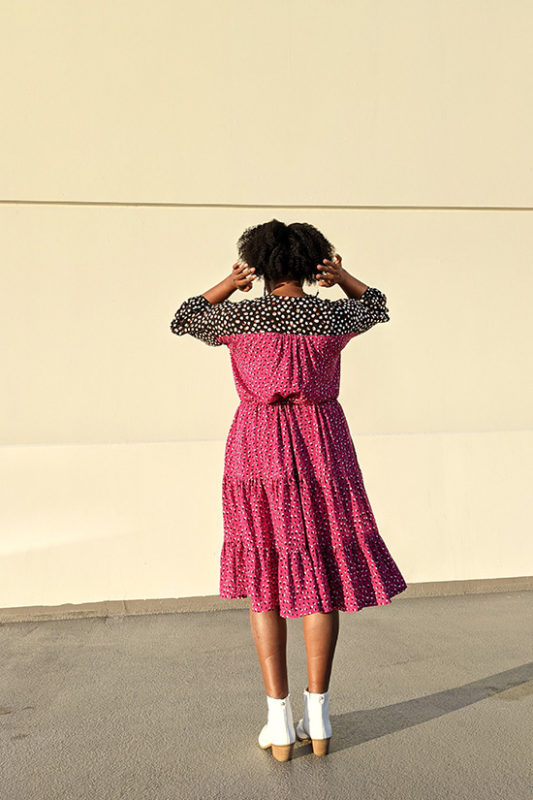
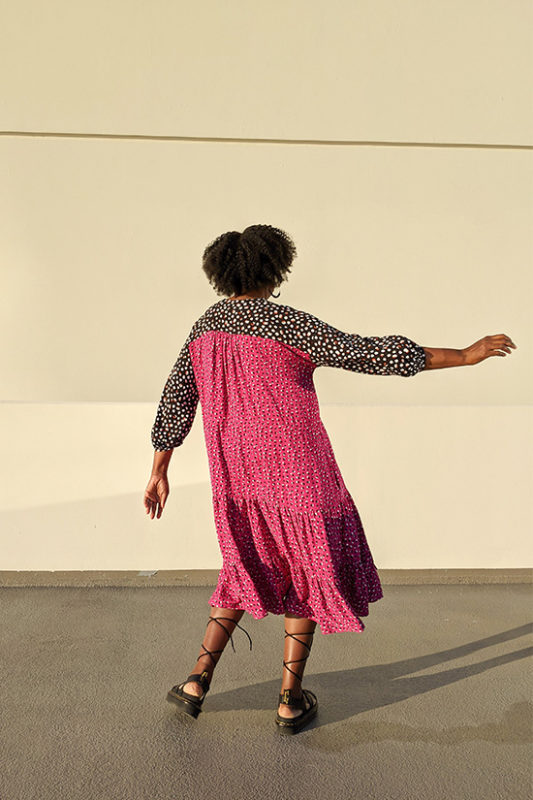
Hi everyone, I’m Pauline of Sew U Think U Can and @sewuthinkucan on Instagram. I’m thrilled to show you how I hacked the popular Fringe dress pattern into a fall appropriate balloon sleeve buttoned down tiered dress with a twist. Depending on your mood, you can dress it down as a swing dress styled with some Doc Martens booties or dress it up by pulling the hidden ties and cinching the waist. Whether you love print mixing, puffed or balloon sleeves, there’s something for everyone with the many options packed in this hack. Pick one or make them all.

Inspiration
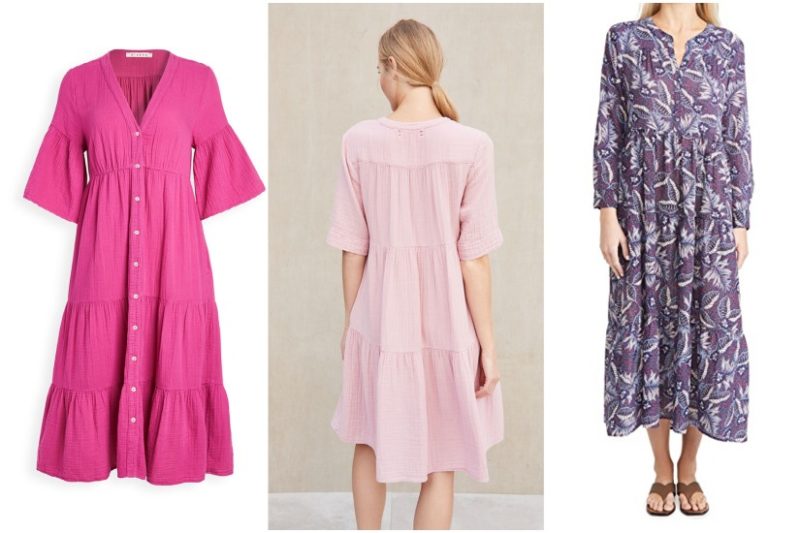
Let’s start with the inspiration behind this dress. I discovered the Xirena brand on Shopbop and love their flowy and summery tiered dresses and tops. The bodice of their Kendall dress reminded me of the Fringe dress and ultimately inspired this hack.
Fabric
Next let’s talk about my fabric choice. I perused the new Stylemaker Fabrics fall fabric collection and found a yummy fuchsia dotted rayon twill fabric and a black dotted rayon poplin for the contrast yokes and sleeves.
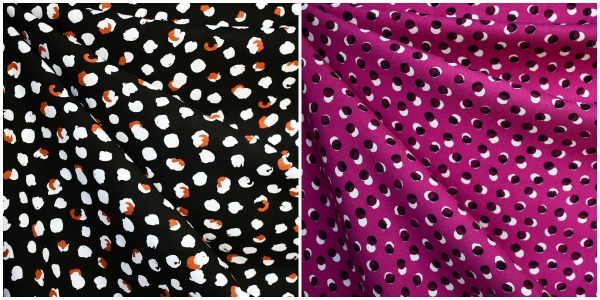
Both fabrics are as beautiful and vibrant as pictured and the drape is perfect so I had to tell Michelle how amazing her selection was. In addition, they wash and sew up really well. You can’t escape print mixing and color blocking in fashion this fall and winter and judging by what I’m seeing in 2021 spring and resort collections will carry long into next summer. I couldn’t be happier. For this Fringe dress hack, the print mixing and color block combos are endless. You can try half and half, front side only, yoke and/or sleeves only for contrast, different prints for the tiers. Have fun playing with all kinds of combinations! I’m excited to see what you will come up with.
What You’ll Need
For this tutorial you’ll need:
- Fringe pattern view A
- 3 yards of print fabric (I originally got 2 ½ yards and should have gotten more)
- 1 yard of contrast print fabric (I originally got 1 ½ yds and 1 yd is enough for the contrast yoke and sleeves)
- Measuring tape
- Tracing paper, pencil
- Plain and curve ruler
Extra supplies:
- Self-made or packaged bias tape for the waist tie channel
- Elastic (optional)
- Additional buttons
Pattern Adjustments
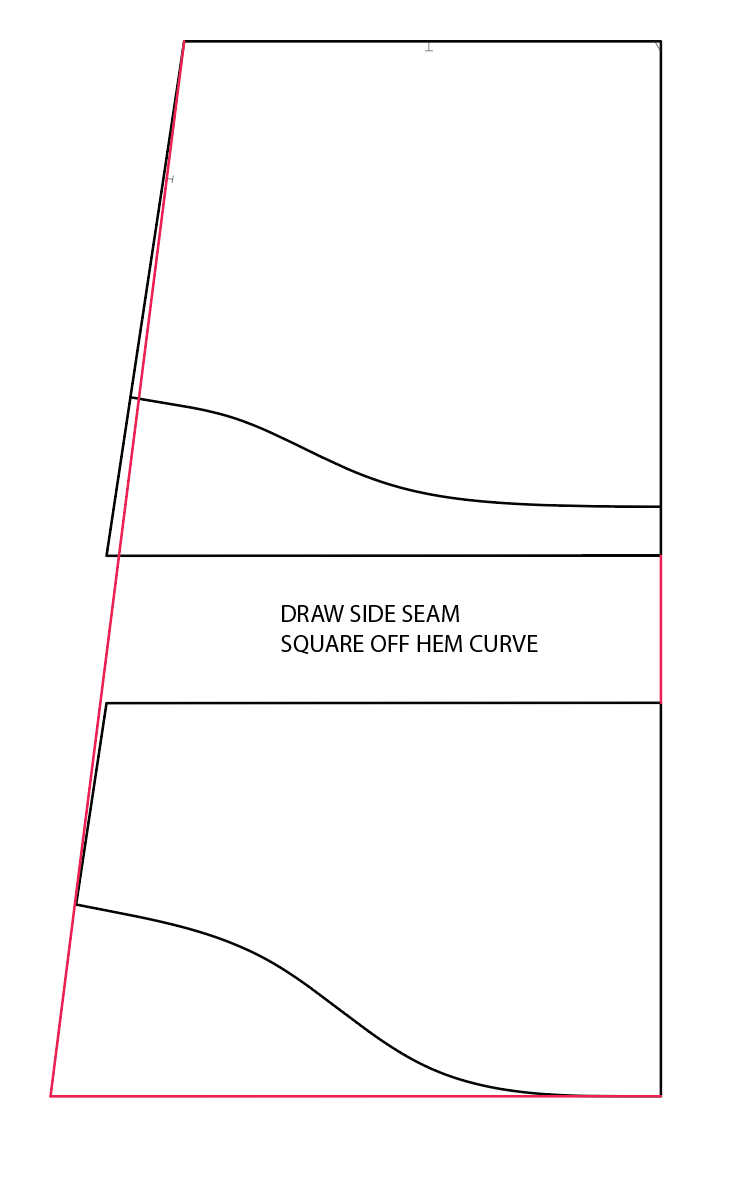
Add Length and Square Off Hem of Skirt
First decided on your skirt length. Since I wanted a midi length, I added 4 inches to the skirt pattern at the lengthen/shorten line. I’m 5’7” for reference.
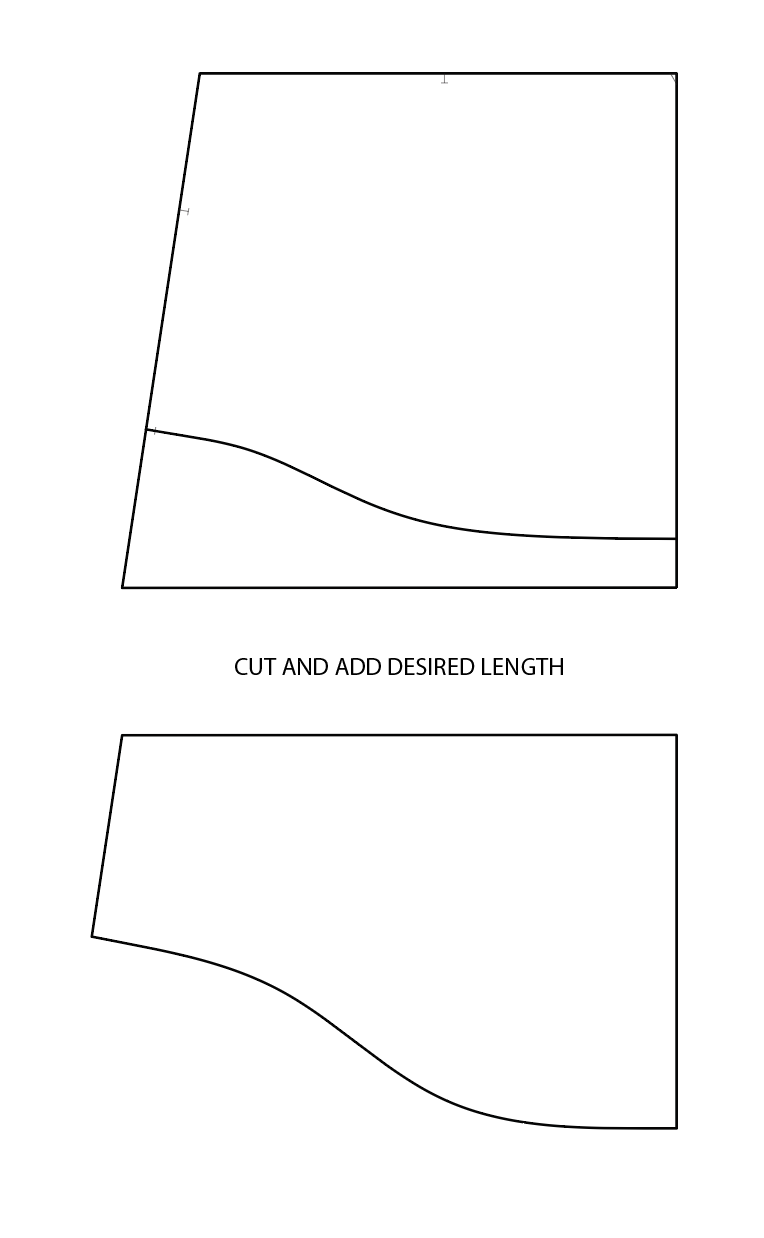
Then square off the skirt hem by lengthening the side seam, drawing a line from the lower part of the hem, and joining those two lines.
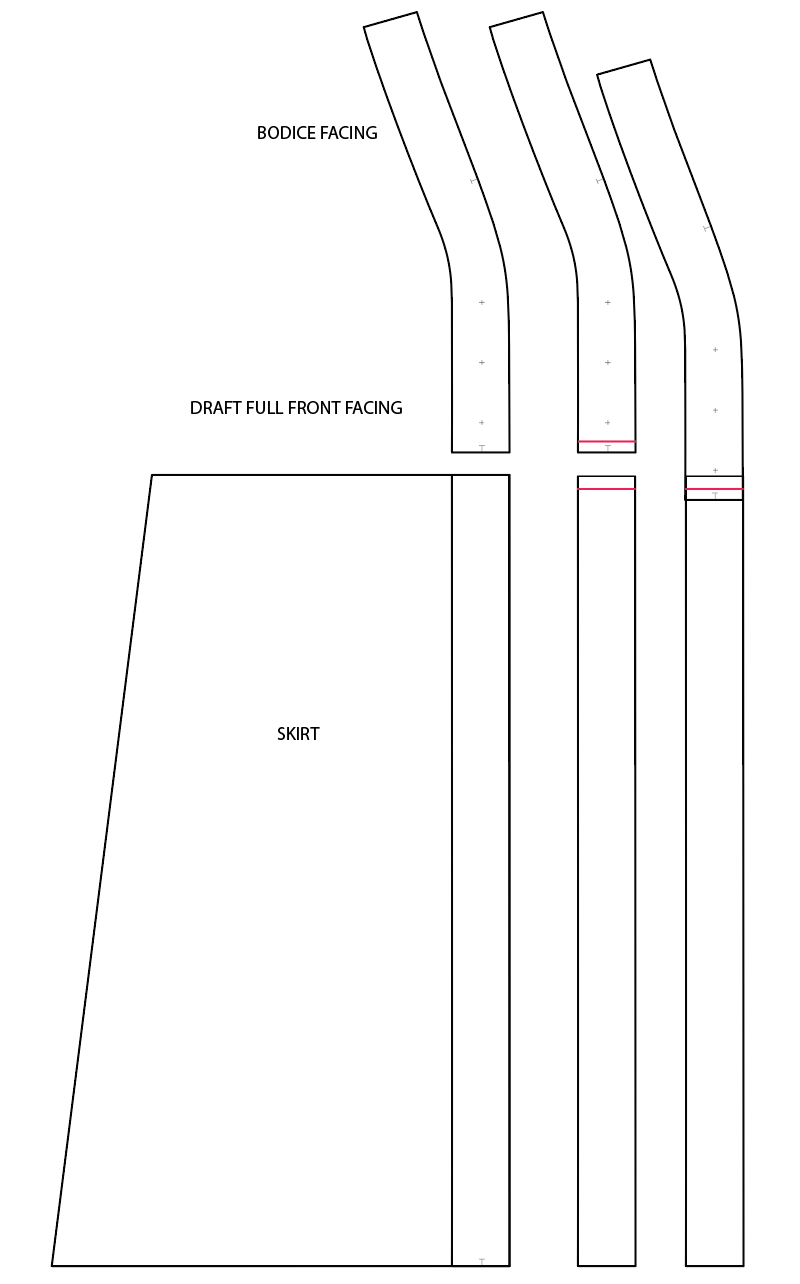
Draft Full Front Facing
Before making more skirt adjustments, it’s time to draft a full front facing.
First, draw lines for the facing on the top skirt piece the same way it is on the front bodice pattern showing the grainline and the center front markings, then trace out the facing part to be cut as a separate piece only so it can be taped to the provided front facing pattern piece. Mark seam allowances.
Tape the bottom of the front facing to the top of the bottom facing by overlapping both seam allowances. You will have a full facing.
Extend the interfacing piece the same way.
Adding Tiers
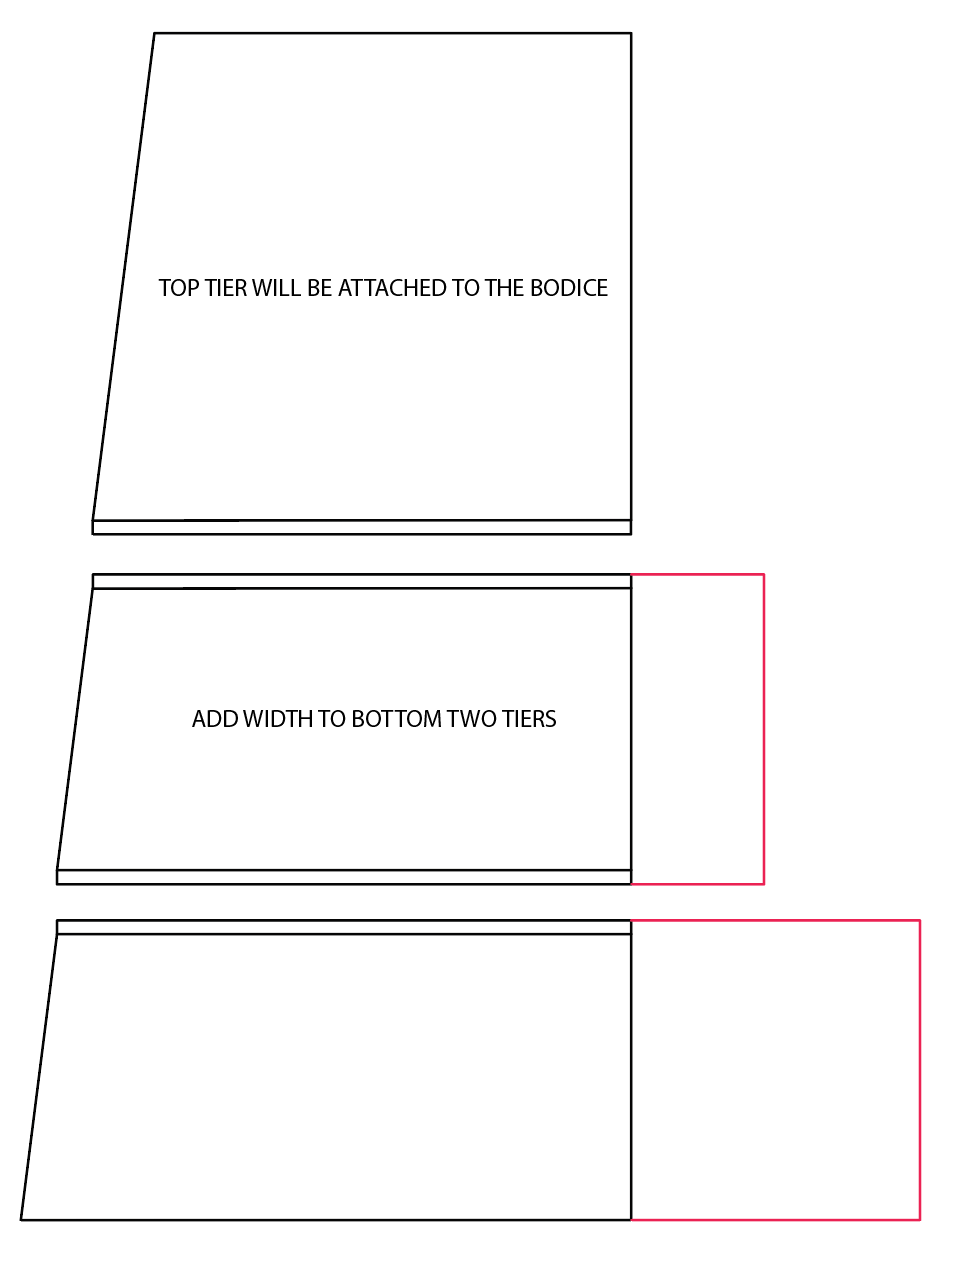
Now we can continue adjusting the skirt. Trace the skirt pattern and marked out the lines for the first and second tiers.
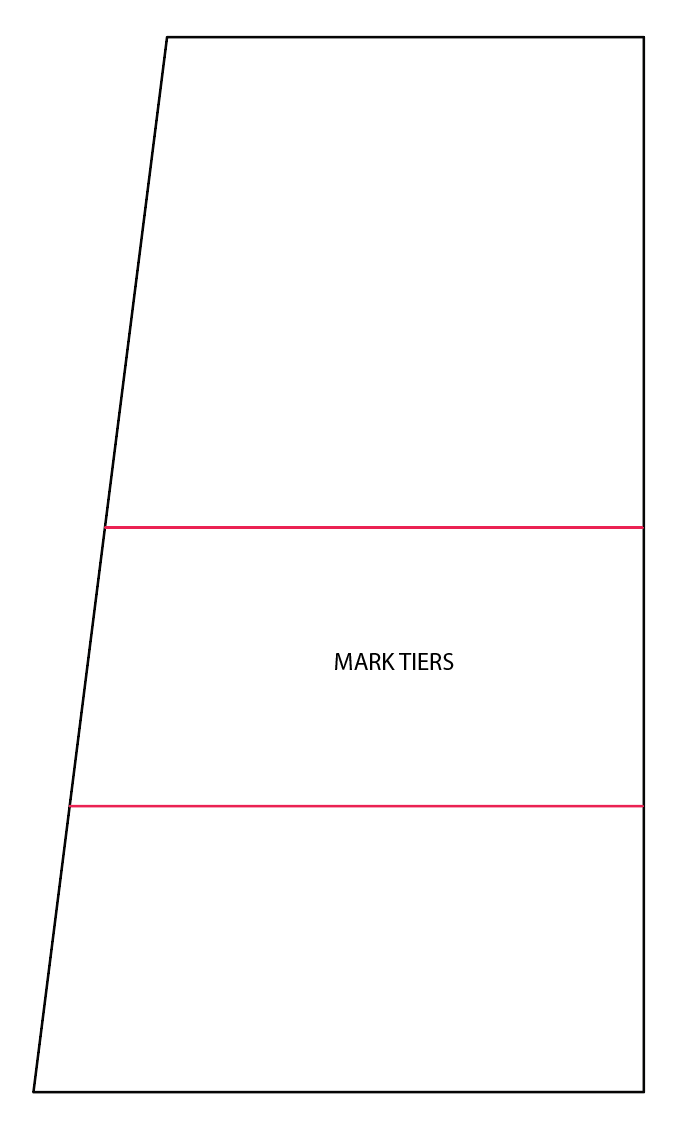
My skirt length is 30 inches. I marked the line for the tier at 12 inches away from the waist so the top skirt piece is 12 inches long. The first tier and second tier pattern pieces are both 9 inches long. Add 3/8″ (1cm) seam allowance to all 3 pieces except the edge of the top skirt since it’s already included.
You will have 3 separate front skirt pieces: top skirt (that will attach to the bodice), 1st tier (gathered tier) and 2nd tier (gather tier). Repeat the same adjustments for the back skirt.
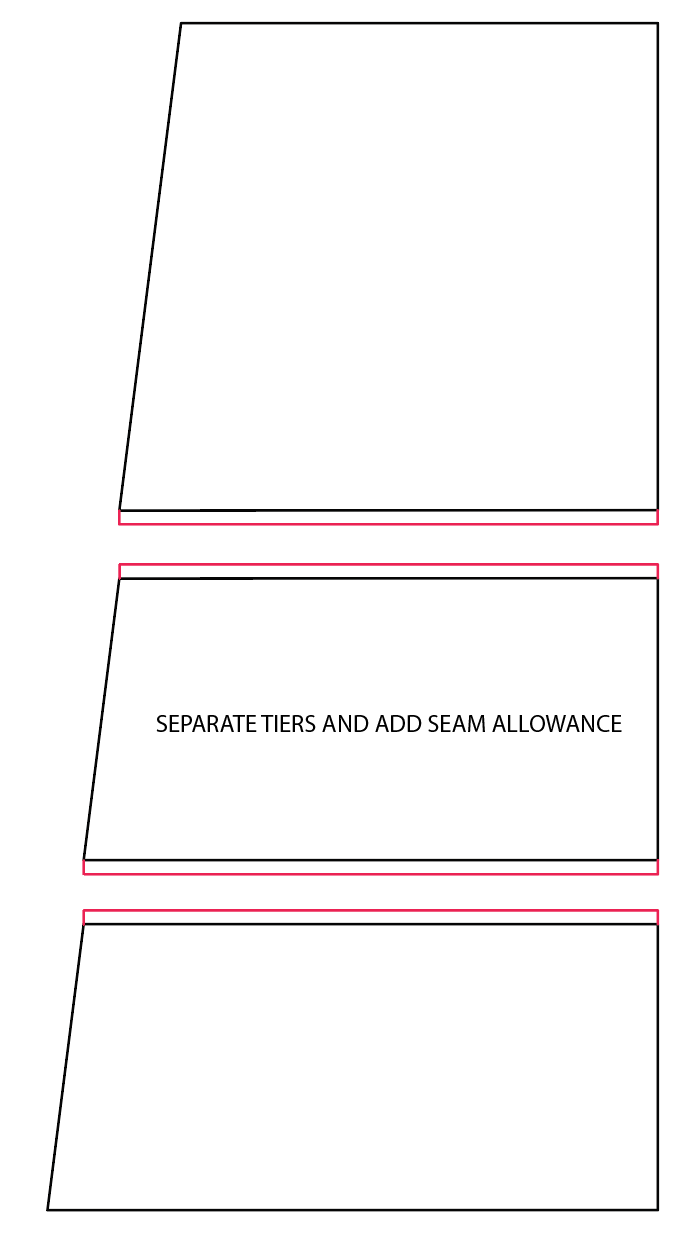
The width of your first gathered tier is the width of the bottom of your bodice x 1.5-2” and the length is 9 inches. Cut 2 middle tier pieces.
The width of the 2nd gathered tier is the total width of the middle tier x 1.5-2”. Depending on the width of your fabric you might need to cut 3 bottom tier pieces.
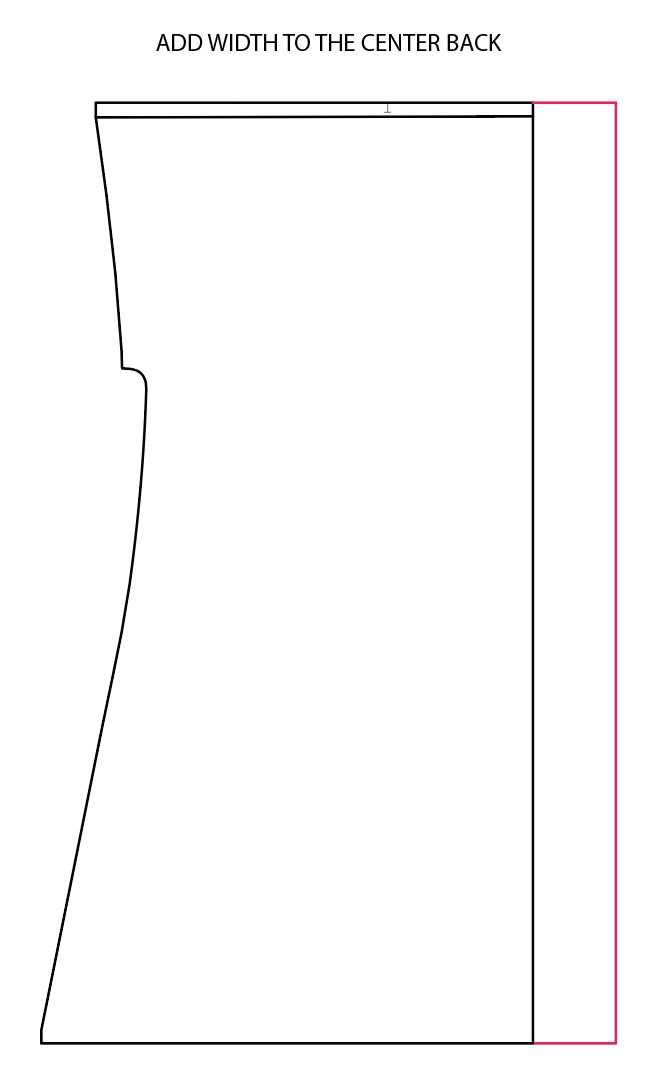
Bodice Front and Back Adjustment
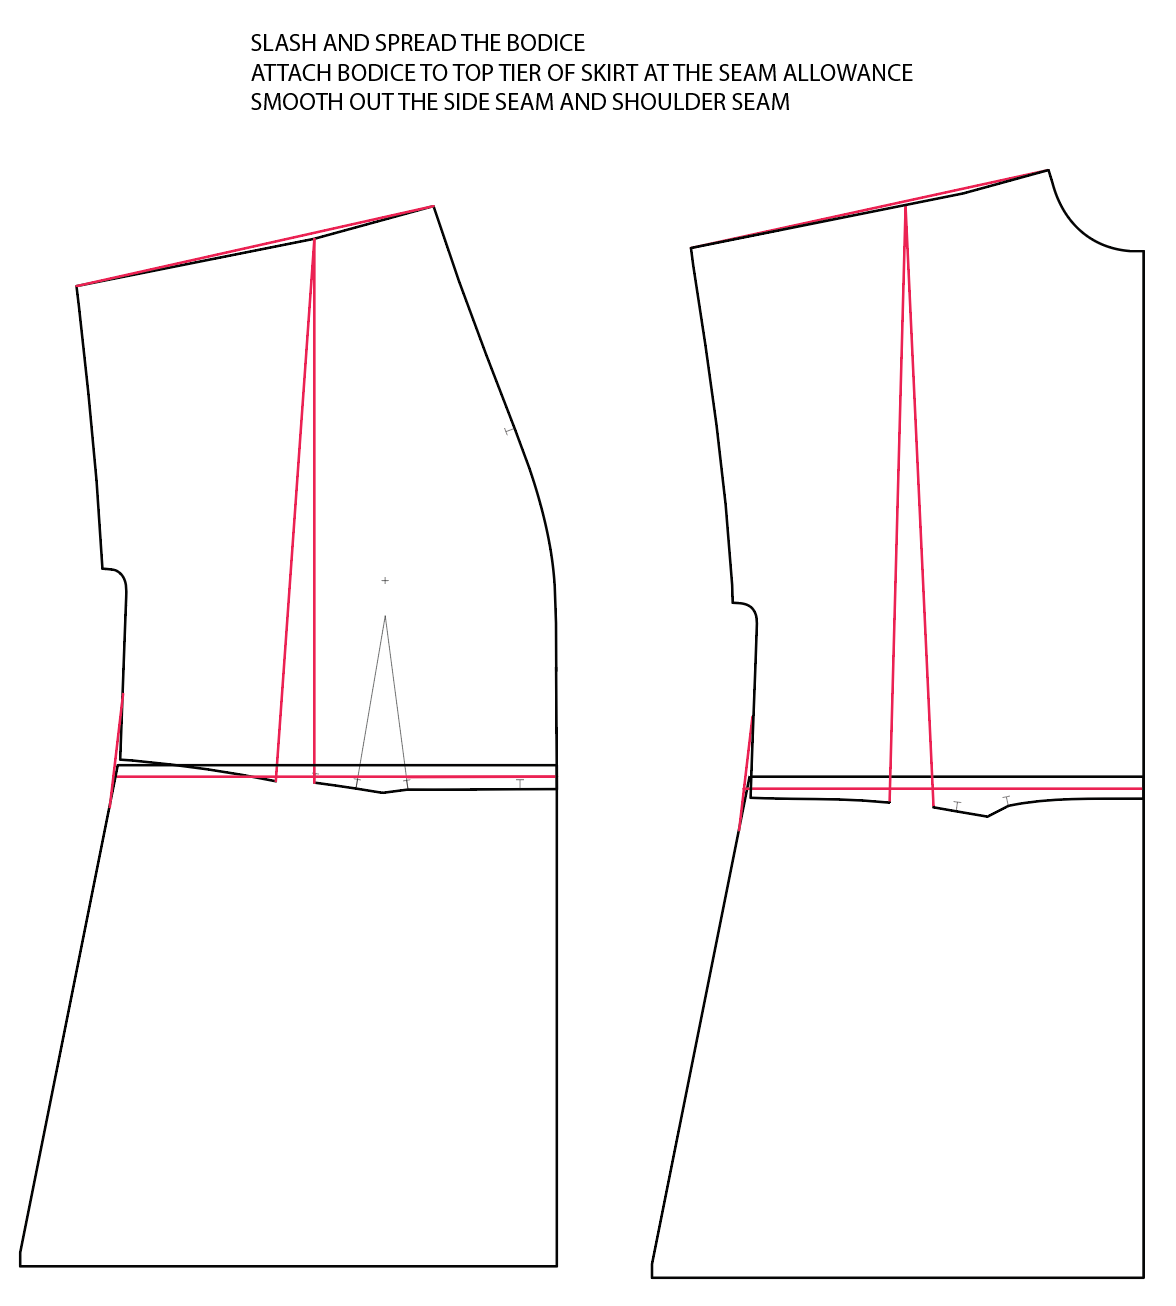
For a swing style dress, I joined the front bodice to the top skirt by taping them together at the waist.
Mark the seam allowance at the bottom edge of the bodice and the top of the top skirt edge. In order for the bottom edge of the bodice to match the top edge of the skirt you will need to slash and spread the front bodice. Draw a vertical line from the shoulders to the waist 3 inches away from the neckline edge. Align the middle front edges and side seams of the front bodice and top skirt. Overlap both seam allowances of the bodice and top skirt and tape them together.
Fill in the gap left from slashing and spreading with paper and tape it together.
Straighten the side seam as it’s a bit angled at the waist after joining the two pattern pieces. It’s simply done by adding some paper to the side seam at the waist and straightening the side seam.
Trim the edge.
Do the same thing for the back piece.
Draft Front and Back Contrast Yoke
I went for a simple straight yoke for both front and back pattern pieces. Take the front bodice piece and draw a parallel line 4” away from your shoulder line. Add seam allowance. That’s your front yoke line.
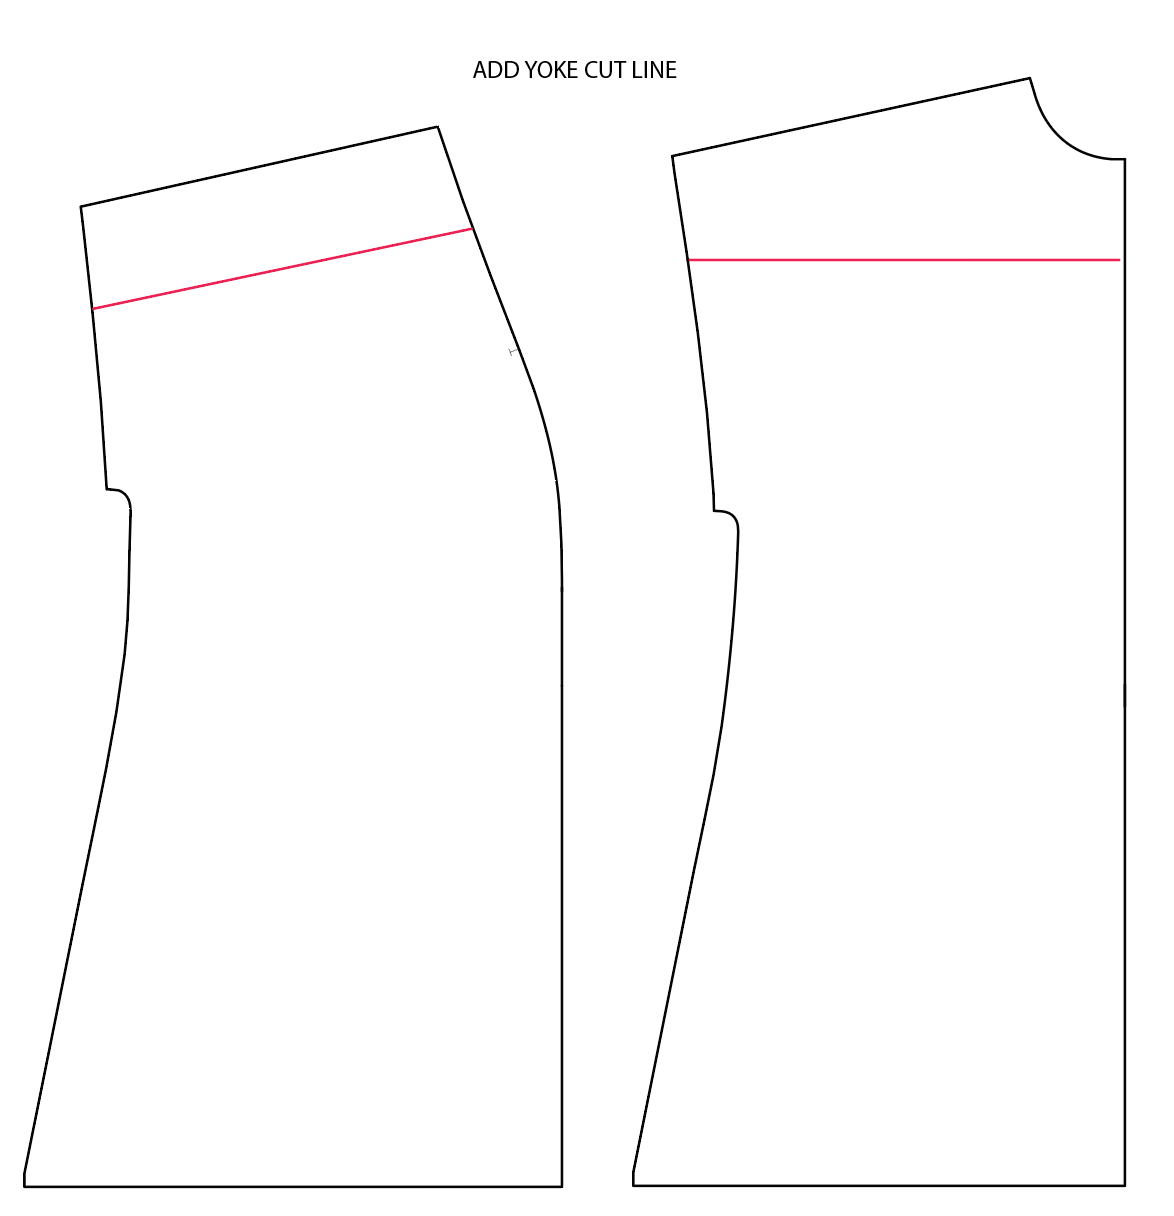
Take your back bodice piece and draw a straight line from the center back to the mid-armhole at 4 inches, making sure that line is at a 90 degree angle, squared, to the center back. Use a square ruler to ensure your line is straight. Add seam allowance. This is your back yoke line.
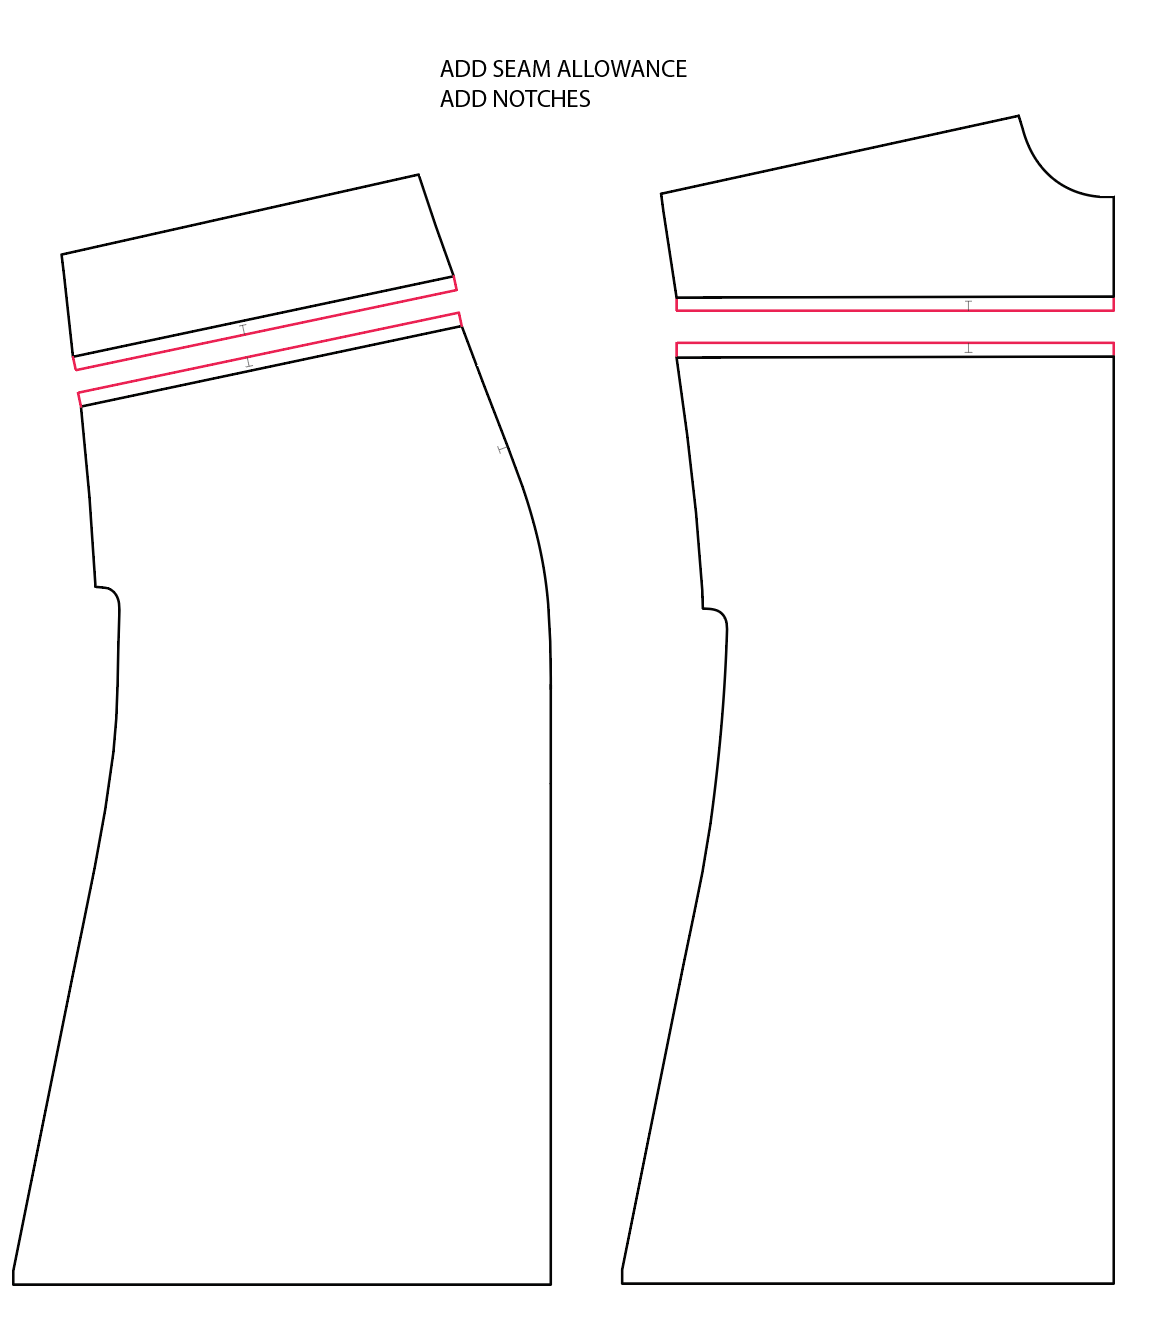
Put a notch on both front and back lines to help match the two pieces back together once they become two separate pattern pieces.
I wanted some gathers in the middle of the back bodice piece so I added 2 inches to the width at the center back before cutting it on the fold. Add notches to the back piece at 3 inches from the center back. You can also do a box pleat if you want to skip the gathers.
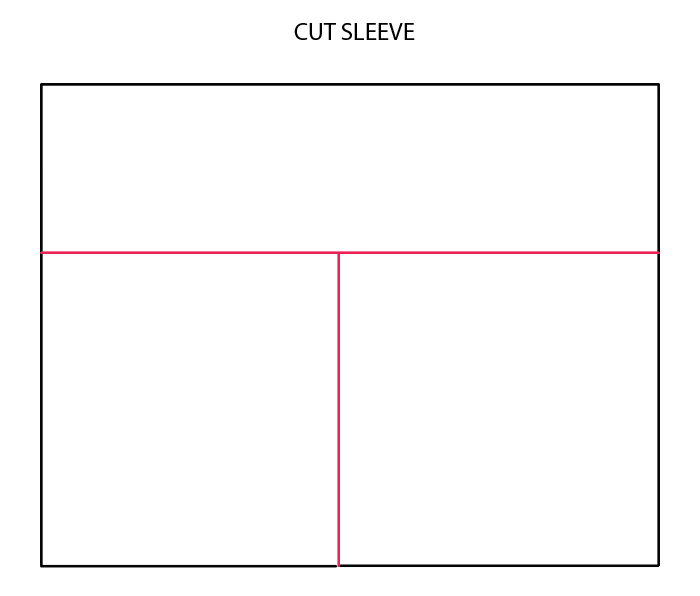
Draft Balloon Sleeve
Take the rectangular sleeve pattern and add 2 inches to the length.

Draw a vertical line down the middle of the bottom piece under the foldline. Cut along that vertical line from the lower edge to the horizontal line which is the foldline. Cut through the horizontal line from the center to the edge, leaving a small hinge of paper at each edge. Spread the two bottom sections the desired amount to add fullness. The more you spread them, the fuller the sleeve will be.
Place a piece of pattern paper underneath the sleeve piece. Tape the pieces down and true the hem with a curved ruler to create the new sleeve piece.
Round the sleeve side seams using a curve ruler.
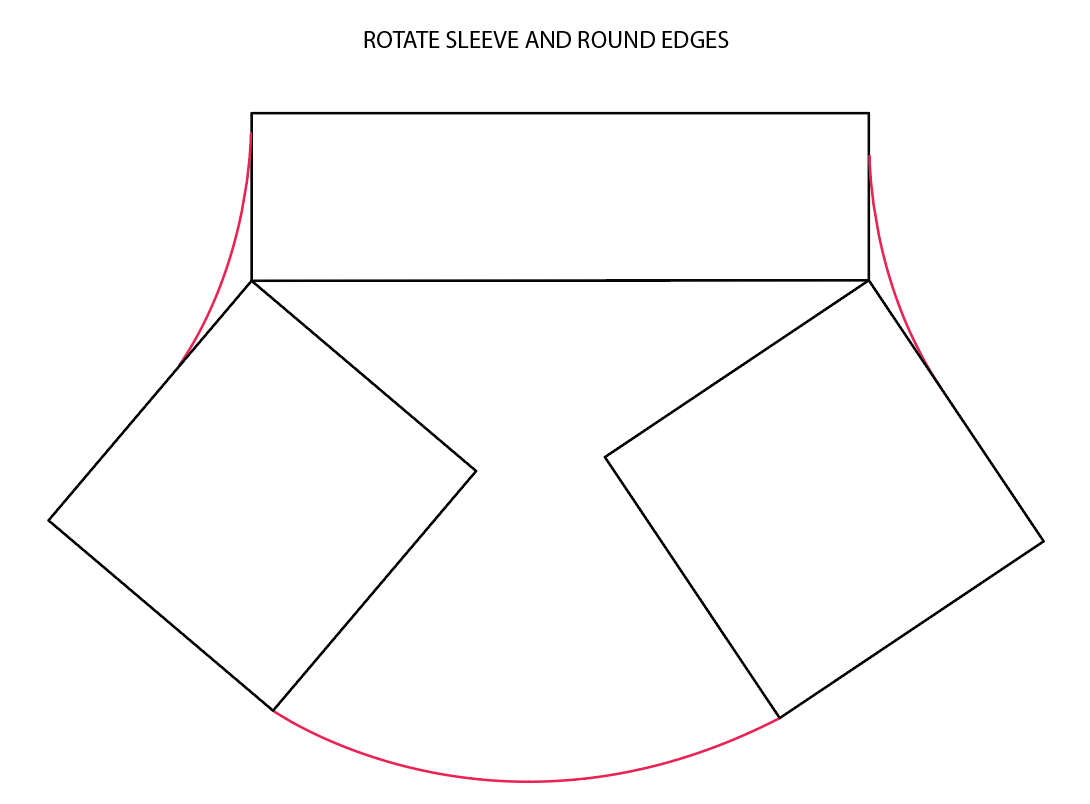
Cut 2 sleeve bands. The length is 1.5 inches but the width of the sleeve band is determined after you find out where your sleeve hem hits on your arms. If it hits mid-forearm measure the circumference of that area, add some ease so it’s not too tight and seam allowances.
Now you have all the pattern pieces that need adjustment ready you can start constructing the dress.
Constructing the Dress
- Attach the front yoke to the front bodice. Press seam up toward the yoke and topstitch(optional)
- Gather the back bodice by basting within the seam allowance between the notches, pull gathers until the back and back yoke match in width. Press seam up toward the yoke and topstitch(optional)
- Sew shoulder seams following instructions step 7.
- Attach sleeves following instructions steps 14 and 15.
- Add pockets following steps 20-21
- Sew side seams and pockets following steps 22-23-24.
- Gather the sleeves at the hem. Stitch the short ends of each cuff together, right sides together. Press the seams open. Sewing in the round attach the cuff to the wrong side of the gathered sleeve matching seams and pinning to secure it properly. Turn the band to the right side and topstitch down.
- Optional Waist Tie: To cinch or not to cinch, that is the question. I couldn’t decide if I wanted the swing dress look for my hacked Fringe dress or keep the initial gathered waist look. I decided to have the option to cinch it when I wanted and leave it untied and flowy whenever I felt like it. Since there’s no waist seam you can create one by drawing a line with a Chaco marker or a heat erasable Frixion pen on the wrong side of the bodice at your desired waist level. You have 2 options: Option 1: you can apply a 1 inch bias tape to the wrong side of the dress, insert elastic through the channel and secure the ends when topstitching the facing down. Option 2: you can cut a waist tie that is 1 ¼ inches wide and the length of the circumference of the waist of the dress plus inches . Follow the Fringe dress instructions on how to sew the waist tie. Make 2 buttonholes on the right side of the fabric where the bias tape channel starts and ends. Use a safety pin to thread the tie through the channel and hand sew a tassel on the tie ends by cutting fringes on rectangular pieces of the contrast fabric.
- Gather tier 1 and 2 starting the gathering stitches 1 ½ away from the front edge to avoid bulk when sewing buttonholes.
- Sew the facing following instructions steps 8-9-10
- Hem your dress by turning under 1⁄4” and pressing, then turning under 3/4” again and pressing once more. Stitch close the first folded hemline edge all the way round.
- Press your dress and you’re done.
Final Look


Thank you to our sponsor Stylemaker Fabrics for collaborating on this post. Use code: NOTCH-1120 for a 10% discount on regular priced items valid through November 30th.

