Tutorial | Fringe Boxy Top
Have you seen some of the Fringe Top hacks popping up on Instagram? We started a hashtag #fringetophack so we could follow along and see all of the cool versions people were making. I noticed the boxy style Fringe Top was getting a bunch of engagement. To me, that means you would like more of this type of content. I reached out to Angie since she was one of the first to post her version and asked if she would be open to writing a tutorial for our blog. I am so glad she said yes! I now have the perfect excuse to make one of my own. I hope you enjoy this post. Feel free to let us know if you have any questions and make sure to tag us when you make your Fringe Boxy Top!
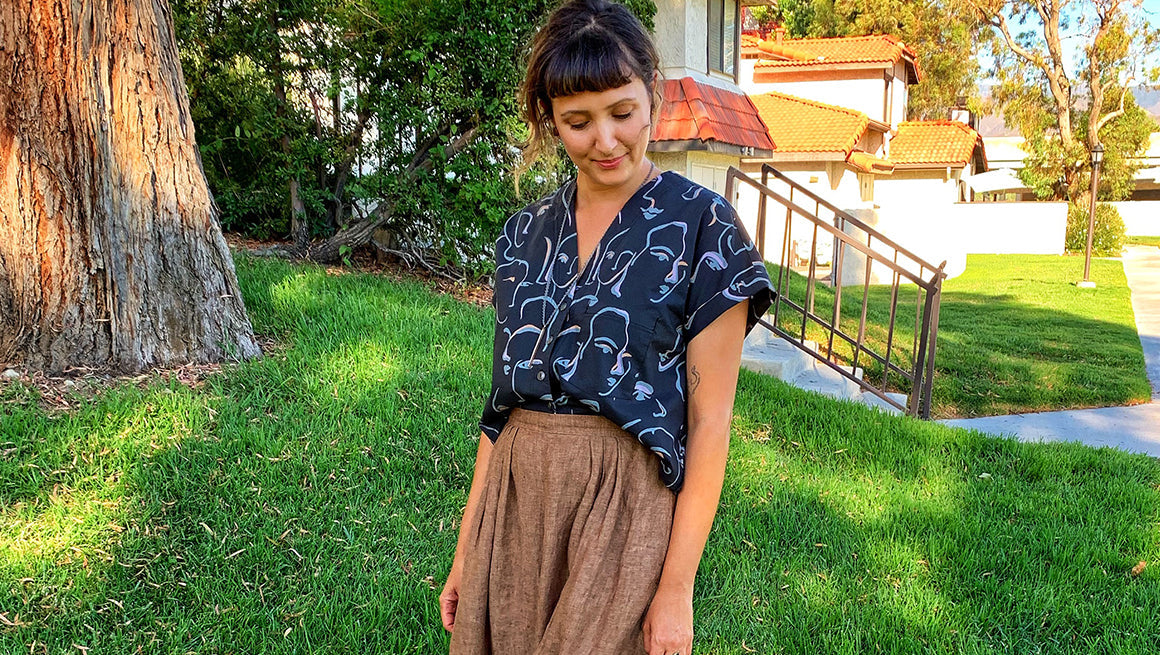
Hello! I'm Angie from The Mindful Sewist stopping by to share a tutorial with you. I am thrilled that Gabriela invited me to guest blog about this hack using the Fringe pattern. This Fringe Top is one of my favorite hacks. In fact, the first version of this top that I made has become a staple piece in my wardrobe. I jumped at the opportunity to make another one and will be walking you through all the steps to complete your own, so keep on reading.
This Fringe Top has a boxy fit but is not too oversized. It is slightly cropped, which works great worn over high- or medium-rise pants or skirts. I love the shape of the neckline and the use of facings included in the Fringe pattern. And must I say buttons!? Buttons are my jam! I'll also be including some sweet lil' details like a patch pocket and a tiny split hem. Let's get started!

Fabric:
The fabric I used for this top is the Onlookers Cotton Lawn purchased from Blackbird Fabrics. I knew it would be a wonderful fit for this top. It is seriously lovely and easy to work with – a fantastic choice for a beginner sewist. Lawn has a super fine weave and feels silky to the touch, making it a wonderful shirting fabric. Cottons are ever welcome on my sewing table. When it comes to cutting fabric, it doesn’t get any easier than cotton. No cumbersome shifty cutting and sewing in this project! Most importantly, the breathability of cotton in all its natural fiber glory makes my new Fringe Top a summertime winner.

What You Need:
- The Fringe Pattern
- Fabric, approximately 1.5 yds (1.4 M) of 55" (140 cm) wide fabric
- 4 buttons (you will be adding 1 buttonhole.)
- Tracing paper, pens, and scissors.
- Front Bodice #1 or #17,
- Back Bodice #2
- Front Facing #5 or #18
- Back Facing #6
- Front Facing Fusible #10 or #19
- Back Facing Fusible #11
- View B Cuff #15
You will disregard the darts when sewing and I will walk you through drafting your own patch pocket if you are feeling inclined to add one.

Adjusting Your Pattern:
The alterations necessary to make the bodice pieces work as a top are incredibly simple.
First, trace your Front, Front Facing, and Back bodice pieces onto tracing paper. Transfer your notches and grainline markings, but you can omit the darts completely.
On your newly traced Front piece take a long ruler and extend the center front of your pattern down by 5.5″ (14 cm) from the bottom edge. Add the same amount of length to the bottom of your front facing.
Next, add width to the hem. Measure 1/2″ (1.2 cm) away from the bottom edge of the bodice at the side seam and mark this spot. You will be using this marking as a guide to angle out the side seam slightly. Take your ruler and draw a line starting right below the underarm curve, through the new marking you just made and ending 5″ (12.5 cm) below the marking.
Then, using freehand or a French curve if you have it, create a slight curved hem by connecting the bottom of your new side and center front pattern lines. You have now lengthened and added a bit of width to your pattern piece.
To adjust the back pattern piece, take a ruler and extend the center back line down extending it 6.5″ (16.5 cm) . Then simply place the new front pattern piece on top, lining up the underarm and side seam curves. Pay attention to the grainlines, making sure they are exactly parallel. Trace the new side seam and finish the back piece by curving the hem.


Drafting a Patch Pocket:
You may choose to use a beloved pocket from another pattern in your stash here to save you some time. If you would like to draft your own, here is how to do it!
Draw a rectangle 5.5″ (14 cm) x 7″ (18 cm) long. Mark a vertical line down the center. From the bottom edge of your pocket measure 3/4” (2 cm) up from the bottom edge of your rectangle on both sides. Draw a line from the bottom center of your pocket to the 3/4” (2 cm) markings you just made. This will be the angled bottom of your pocket.


Cutting Your Fabric:
Cut your fabric according to the instructions using your newly altered pattern pieces and patch pocket pattern piece. This fabric is directional so all of my pattern pieces had to be facing the same direction to avoid any upside-down faces.

Sewing Your Fringe Top:
Before I began sewing I overlocked the top edge of my patch pocket and the side seams of my top. In order to create a split hem it’s important to finish the seam allowances of your top separately. This differs from the original instructions included in the Fringe pattern. Below I will be sharing specific changes that I made to the pattern, but otherwise refer to the Fringe pattern instructions to sew this top.
Preparing your pocket:
Fold the top edge back at 1” (2.5 cm) right sides together and pin in place. Sew both sides of the fold at a 3/8”(1 cm) seam allowance. Use a point turner to turn your corners right side out and press the 3/8” (1 cm) seam allowance in around the remaining pocket edges. Topstitch the top of the pocket at 7/8″ (2.2 cm).


Facings:
After sewing the facing pieces together I opted to serge all along the outside edge rather than pressing the outside edge under as included in the pattern. Continue with understitching and pressing your facing to the inside of your top. Don't topstitch your facings just yet!
Finishing the Facings at the hem:
At this point, we will be finishing the corners where the facing meets the hem. Turn the bottom corner of the facing back so it is right sides together again with your top. Stitch across the bottom at a 3/4” (2 cm) seam allowance; the hem will be 3/4″ (2 cm). Trim your corner and turn it right side out using a point turner or something sharp to be sure you have a nice square corner at the bottom center front of your top. Repeat on the opposite side.


Before topstitching the facing you’ll have to turn the raw edge of your hem under by about 1/4″ (0.6 cm). You only have to do this near the facing for now and you can complete the hem later if you wish. This creates a really neat finish where the hem meets the facing.
I added two lines of topstitching for a unique touch because why not have fun with it, right? To do this I sewed one line of topstitching right along the serger thread. Then using my 1/4″ (0.6 cm) foot, between the first line of topstitching and the center front of the top, I sewed another line parallel to the first.
Use a ruler to evenly distribute an extra buttonhole to the bottom of your placket.

Split hem:
If you'd like to include a sweet little split hem, follow the next step or otherwise sew the side seams as normal.
Before sewing the side seams of your Front and Back pieces, mark the point of the split hem by placing a pin 4″ (10 cm) away from the bottom at both side seams. Sew your side seams, stopping and backstitching at the marked point on both sides of your top.

Press your finished seam allowances open. Be sure to press the 3/8″ (1 cm) seam allowances below the point where your stitching ends.
Topstitch the split hem using a 1/4″ (0.6 cm) seam allowance beginning at the bottom edge and passing the point of the split hem by about 1/4″ (0.6 cm). With your needle down, pivot to sew across the top of the split hem, pivoting again to stitch down other side ending at the bottom edge. Repeat on the other side of your top.

The Cuff and Pocket:
Follow the instructions to attach the View B cuff to the sleeve edges. I folded the cuff and hand tacked the folded cuff in place at the top and bottom of the sleeve.

After attaching the buttons, try on your top and decide on the placement of your patch pocket. Note that you can use your pattern piece to help set your pocket on grain. My patch pocket is placed on the left Front.
Before sewing on your pocket be sure that it is sitting parallel to the grainline. Sew the pocket to your top using a 1/8″ (0.3 cm) seam allowance. I added a narrow bartack at the upper corners of my pocket for added strength.

The Hem:
Continue to press the 3/4” (2 cm) along the bottom of your top. Next, press the edge under by 1/4” (0.6 cm) and stitch in place.

Your new Fringe top is complete!
Thanks for following along with me! I hope you love your new Fringe top as much as I love mine. Kudos to Chalk and Notch for drafting such a beautiful, versatile, and hackable pattern. This wardrobe staple is going to get so much wear this summer!


