FITTING AND CUSTOM ADJUSTMENTS FOR YOUR FRINGE
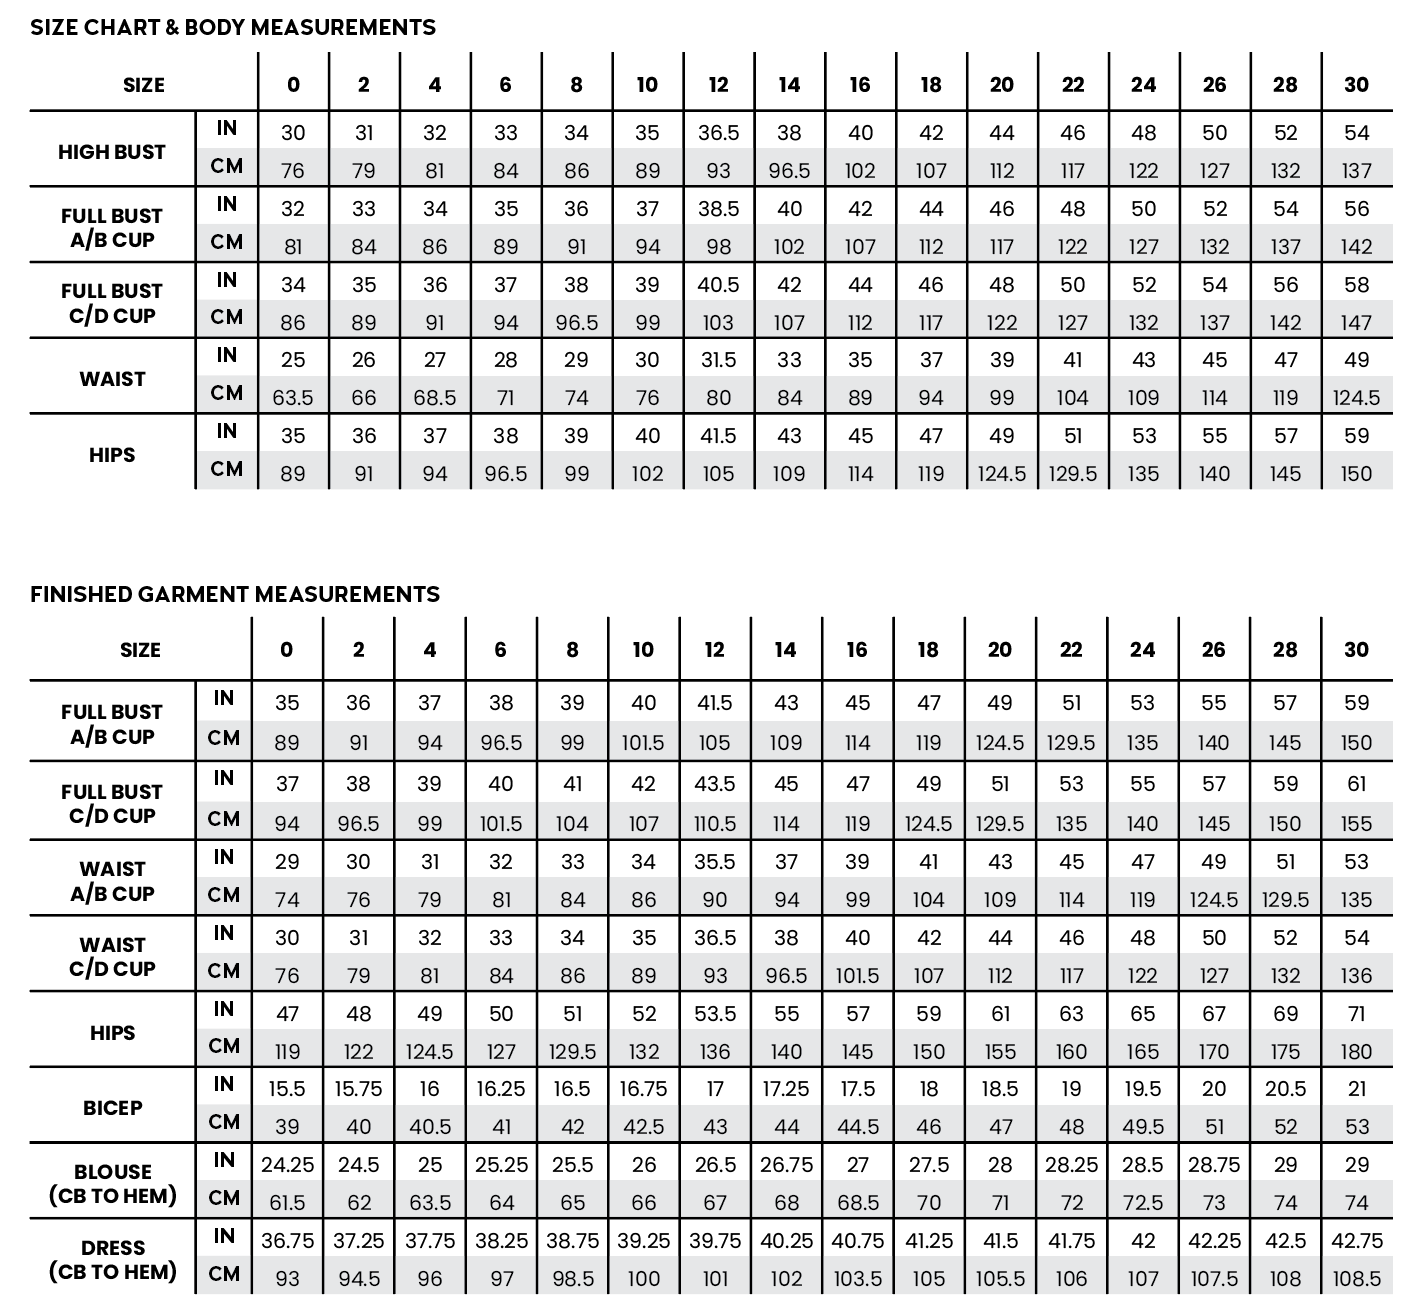
I hope you are as excited about the new updates for the Fringe pattern as I am! Our new size range is 0-30 with two bust cup options (A/B & C/D). The C/D cup option is a built-in Full Bust Adjustment. My hope is that these changes will help more people make the Fringe pattern with fewer adjustments. Basic custom adjustments are included in the pattern (some are listed below), but I wanted to have a separate post with more details.
The reality is that no pattern will fit every body type and it’s very common to need to make custom adjustments. Please don’t be discouraged if you need to make a few adjustments. In this post, I hope to help you with some of the most common adjustments I have seen after working with almost 100 testers after testing the Fringe two separate times. Also, remember that the goal should be to create a comfortable garment that you will enjoy wearing. I don’t think it’s important to get rid of every single drag line and pull, so be kind to yourself as you are analyzing your fit. If you have any specific questions, you can always reach out in our Chalk and Notch Facebook Group or email me directly at: [email protected].
MAKING A MUSLIN
I will always advise you to make a muslin or toile (test garment) before cutting into your final fashion fabric. You can sew the bodice, omitting the sleeves/cuffs, to give yourself a good idea of the fit. However, since the Fringe is designed for a light to medium weight woven fabric with nice drape, you won’t get a feel for the real fit unless you sew it in a comparable fabric. In my experience, if you use a cotton muslin to test fit, the bodice will feel tighter and have more drag lines than when sewing with something similar to a rayon challis. Also, just a reminder that the Fringe has a dropped armhole, so drag lines through the armhole are totally normal and inevitable in this design.
CUSTOM ADJUSTMENTS
LENGTH ADJUSTMENTS
For reference, Chalk and Notch patterns are designed for a height of around 5’7″. My fit models are all over 5’7″ but all patterns are tested on a range of heights. For reference, if you are 5′ tall, you may need to shorten the pattern by up to 3″ (7.5 cm) total, and if you are 6′ tall, you may need to add 3″ (7.5 cm) of total length, but usually it’s not more than 3″ (7.5 cm) either way. We all carry our length in different places; making a muslin can help you decide how much and where you need to adjust for length. For example, Meg & Meghan are the same height but needed different adjustments:
Meg of Meg Made Sewing is 5′ 1″ and she removed 1.5″ from the bodice (needed it above and below her bust) and left the skirt length.
Meghan of Joyfulemon is 5′ 1″ and she removed 0.75″ from the bodice and 2″ from the skirt, and then evened out the hem a bit.
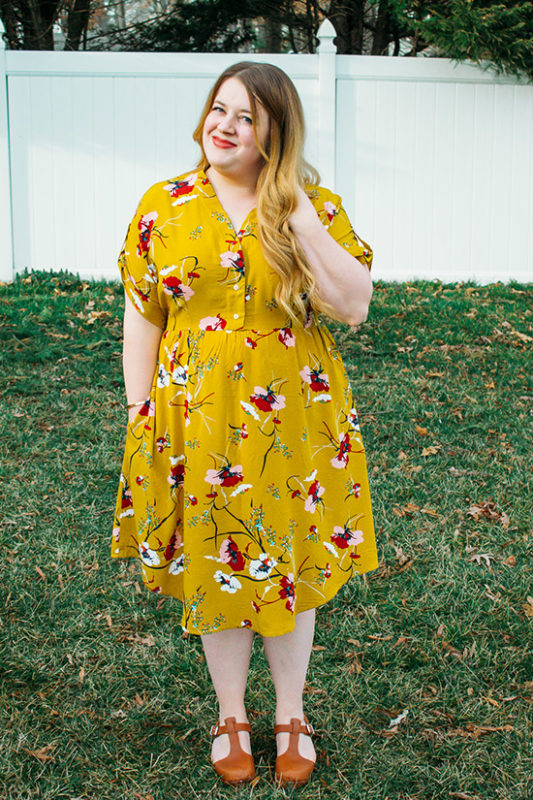
Meg of Meg Made Sewing 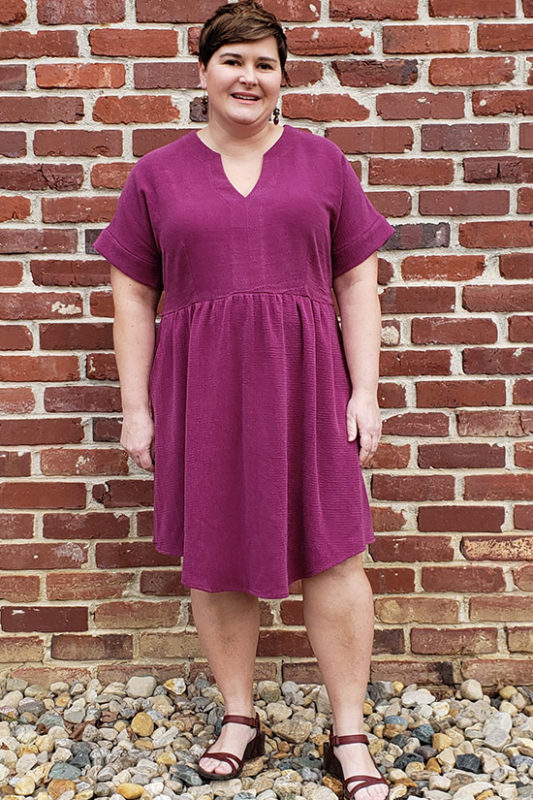
Meghan of Joyfulemon
Bodice Length Adjustments
The waistline is meant to hit at the natural waist or just above, but this is a very personal preference and there is no right answer. Keep in mind that once the skirt is attached to the bodice, the waistline will be pulled down a bit with the weight of the skirt. You can adjust the bodice length at the cut line marked on the pattern (through the rib cage). However, if you need to adjust the bodice length more than 1″ (2.5 cm), you might want to split some of the adjustment above the bust (through the armhole) to balance out the length. If you adjust through the armhole, make sure to adjust the sleeve or cuff as well.

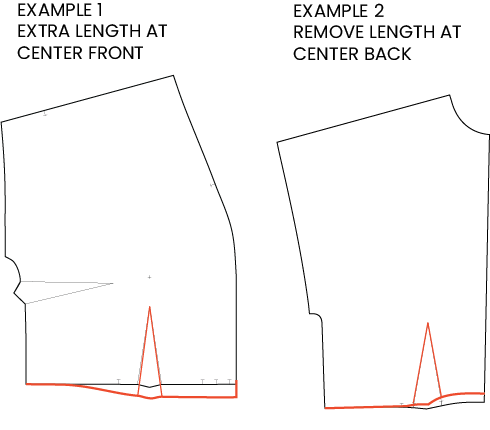
You might also find that you need to adjust the length in just a specific place. Maybe you need more length at the center front or maybe there is bunching in the center back and you need to remove length. You can adjust accordingly instead of lengthening or shortening the entire bodice for a custom fit. When adjusting the front bodice, make sure to adjust any facing pieces.
BUST POINT & DART ADJUSTMENTS
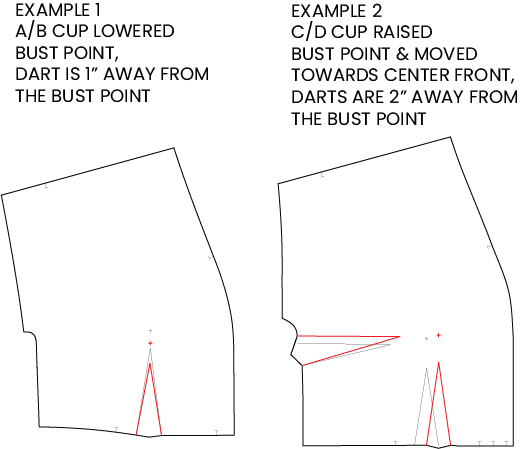
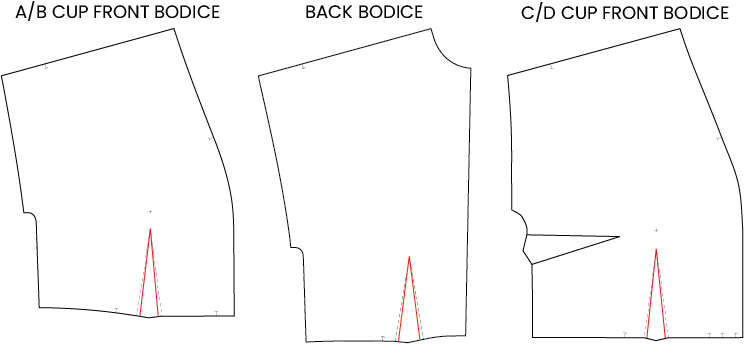
After you make any bodice length adjustments, you’ll want to make sure the dart placement is accurate. The bust point (apex) is marked on the pattern and the darts should be about 1″ (2.5 cm) away from the apex on the A/B cup and about 2″ (5 cm) away on the C/D cup. These are “standards” but I always say there are no rules when custom fitting. You can easily redraw the dart points to be the distance from your bust that you prefer.
Skirt Length Adjustments
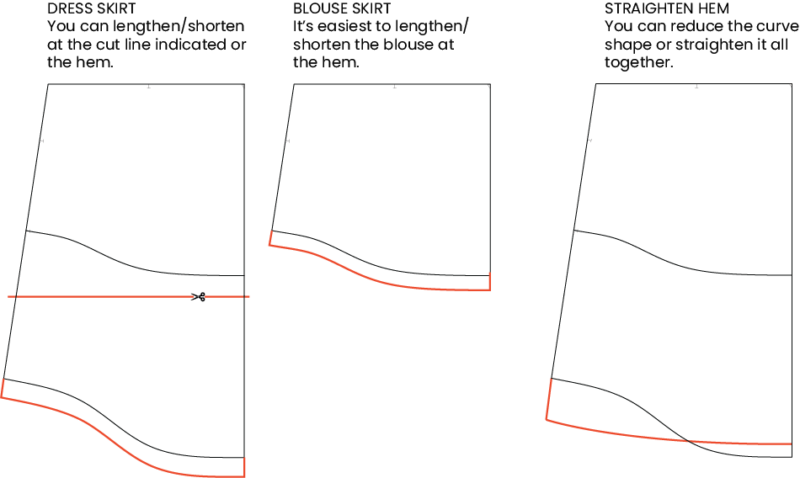
There is a lengthen/shorten line on the dress skirt, and you can adjust there if you know how much you want to adjust before cutting. If you are adjusting by 2″ (5 cm) or less, you can also change the length at the hem without affecting the skirt shape too much. It’s easiest to adjust the blouse skirt at the hemline. Often people prefer to reduce the curve shape or straighten it, and that’s a super easy adjustment too.
BLENDING SIZES AND ADJUSTING THE WAIST DARTS
If you need to blend sizes at the waist, you can alter the width of the darts or eliminate them altogether. There are four waist darts (two in the front and two in the back), which add up to over 6” (15 cm) of ease. You could easily go up a size in the waist using this method of blending sizes. Please note that the gathering ratio is pretty low for this pattern. For every 1″ (2.5 cm) you increase, you will want to go up a size in the skirt so that you maintain the skirt gather ratio.
FULL BUST ADJUSTMENT
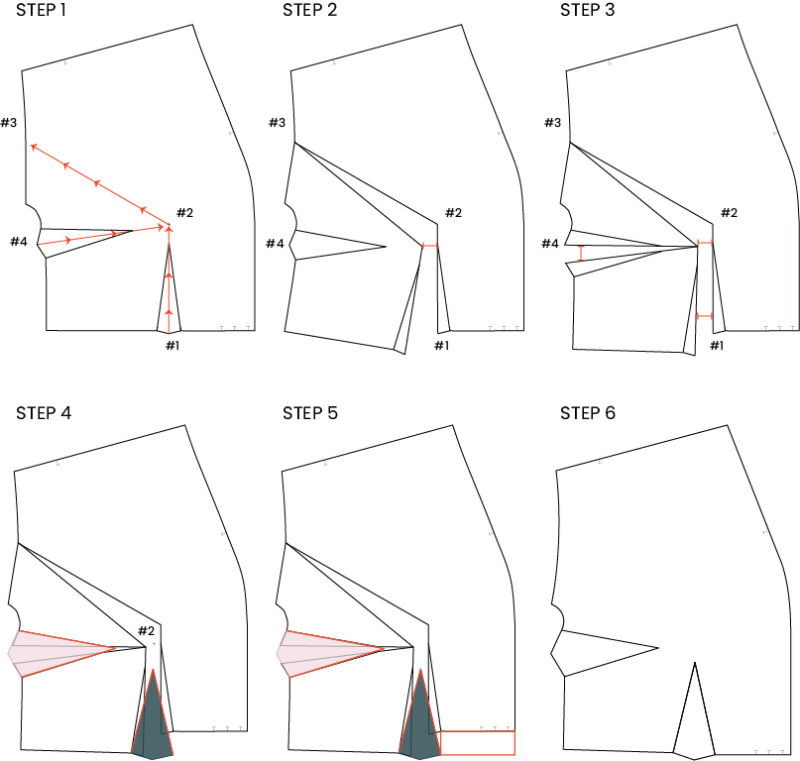
By adding a C/D cup we have created a built-in Full Bust Adjustment with 2″ more ease through the front bodice. If you have over 4” (10 cm) between your high bust and full bust, you may need to add a Full Bust Adjustment to the C/D Cup Bodice.
First, decide how much more ease you need through your bust and you will add half that amount to your pattern. If you need 1” (2.5 cm) then you will add 1/2” (1.25 cm) to the pattern.
Step 1: Cut from the center of the waist dart (#1) to the bust point (#2) and to the armhole (#3), not cutting all the way through at the armhole. Also cut from the center of the bust dart (#4) to the bust point (#2) without cutting all the way through at the bust. Lay this on top of a new piece of paper.
Step 2: Open the ease at the bust (#2), and make your pattern parallel by adding the same amount down to the hem (#1) – shown in RED.
Step 3: When doing this you will open ease at the points (#1 & #4), creating larger darts. Tape this new shape down on the paper.
Step 4: Mark your new dart point at least 2” (5 cm) back from the bust point (#2). Draw the dart lines from this new point to the dart notches – shown in PINK and DARK GREEN.
Step 5: The center front hem will now be shorter than the side front; add the missing length at the hem – shown in RED.
Step 6: You have completed the FBA. Retrace the bodice and make the necessary adjustments to the facing pieces.
BICEP ADJUSTMENT
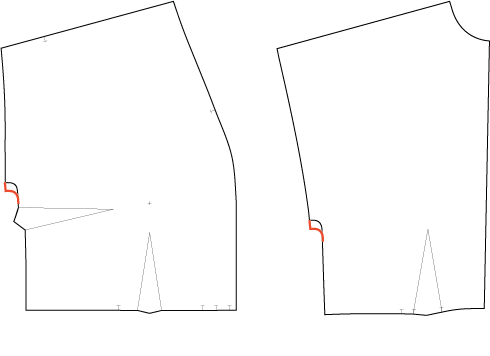
The body and garment measurements are listed for the bicep area. You can add to the circumference of the armhole by lowering the armhole curve. The grade through the bicep is 0.25″ (0.6 cm) for sizes 0-18 and 0.5″ (1.2 cm) for sizes 18-24. In this example, I added 0.5″ (1.25 cm) to the armhole curve. When adding to the bicep, make sure to use the sleeve/cuff pattern piece that matches the difference you added to your armhole.
SHOULDER SEAM ADJUSTMENT
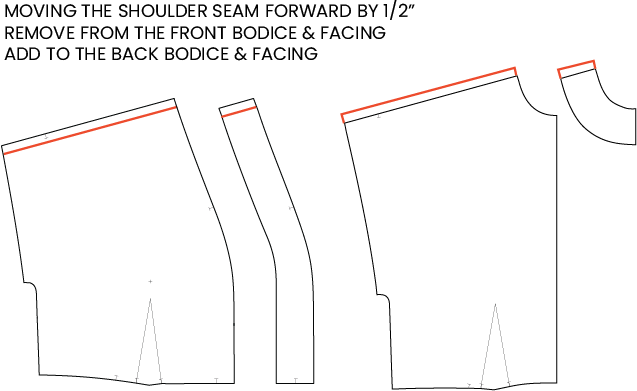
The Fringe was initially designed to have a slight forward shoulder seam, about 3/4″ (2 cm) forward. Throughout testing, the shoulder seam was actually centered on most people, so if the shoulder seam is centered or slightly forward, that is the intended placement. If you need to adjust the placement of the shoulder seam, it’s an easy adjustment. In this example, I’m moving the shoulder seam forward by 1/2″ (1.25 cm). The new seam is in red. Remove 1/2″ (1.25 cm) on the Front Bodice and add 1/2″ (1.25 cm) to the Back Bodice. Make sure to make the same adjustment to the facing pieces. If you need to move the seam back, you will do the opposite: add to the front pieces and remove from the back.
I hope this post helps explain how to do custom adjustments for the Fringe and when you might need them. It’s totally worth the time to make a muslin, make any adjustments and update your printed pattern. Remember to make notes for yourself so that when you come back to the pattern, you remember what adjustments you have made.
XO, Gabriela

