Joy Sew Along | Getting Started
Welcome to the Joy Jacket Sew Along! Over the next nine posts, you will find everything you need to sew your own Joy with extra tips and tricks along the way. Each step has a photo reference, and there are a few videos for the tricky parts. Please feel free to ask questions in the comments or join the Chalk and Notch Facebook group for additional support. We hope this series will give you the confidence to sew your own Joy Jacket.


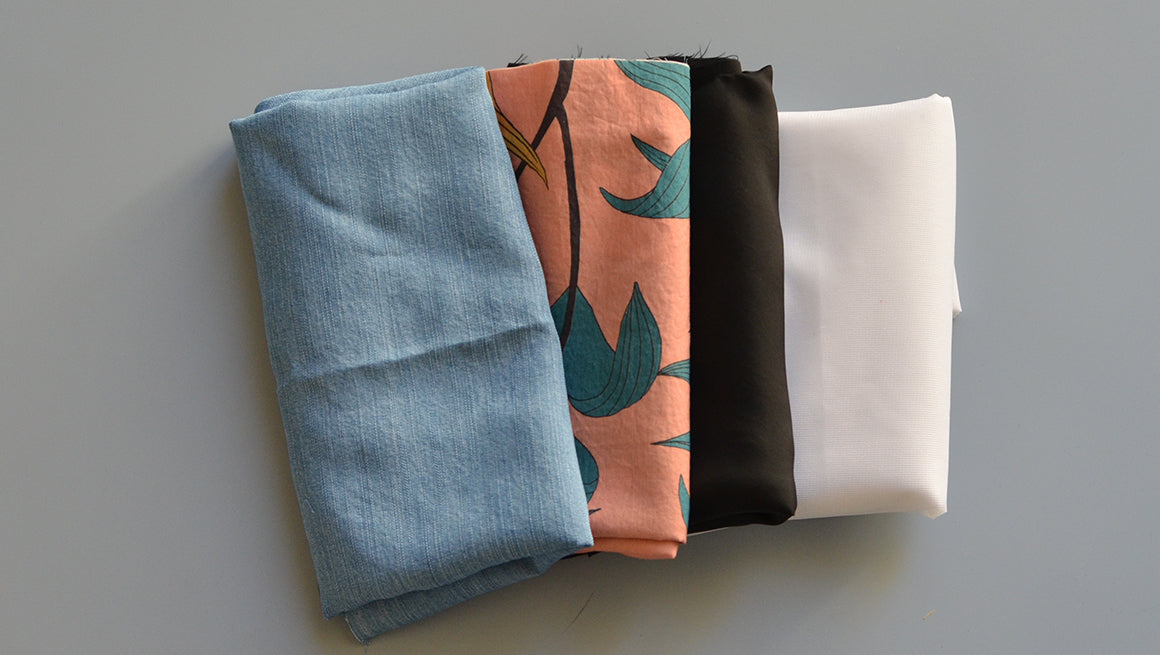
For my sample of View A, I used a Slubby Tencel Denim - in a Light Blue Wash from Blackbird Fabrics. The bodice lining is a Cotton ‘Marlie’ Poplin, from ZoeMommaFabrics on Etsy. I've been saving this print for a special project, and this felt like the perfect pattern. Since the poplin isn't very slippery I used bemberg lining for the sleeves, also from Blackbird. The fusible interfacing is Heat’n Bond Q2432 Tricot Fusible.


For the View B Sew Along sample, I used a Tencel Twill - in Slate from La Mercerie. The cotton lawn lining is also from La Mercerie. Since the lawn isn't very slippery I used bemberg lining for the sleeves and for the pocket linings, from Harts Fabric. The fusible interfacing is Heat’n Bond Q2432 Tricot Fusible.
SEWING SUPPLIES
To start, we are going to talk about the sewing supplies and notions you'll need and where you can buy them. You might already have what you need in your stash.
FABRIC - Main & Lining
As listed in the pattern, this style is designed for medium weight woven fabrics with a nice drape, approximately 5 oz - 6.5 oz (175 gms - 220 gms). Recommended main fabrics: tencel twill, tencel denim, rayon twill, and rayon linen. I have a post with loads of fabric inspiration and resources here (please note: the codes are already expired), and this should give you a good reference. You can also review the fabrics that the testers used by reading their posts here.
Recommended lining fabrics: bemberg rayon, viscose batiste, lawn, and flannel. If you are using lawn or flannel for the body lining, bemberg rayon, viscose batiste or a slippery lining is recommended for the sleeves (like I used in my samples above). If you are splitting up the lining by using a lawn for the body and slippery rayon for the sleeves, for example, then I suggest finding fabrics that are 54" (or wider) and you will only need 1 yard of each for the body and sleeves.
TRICOT FUSIBLE INTERFACING
Tricot is traditionally used for knits, but I always recommend it for light to medium weight woven apparel projects. You can read more about why in this post I wrote for Fabric.com here. Since this is a jacket, I felt like Heat’n Bond Q2432 Tricot Fusible was the best option since is it has slightly less stretch. This is the fusible interfacing that I have included in the trim kits.
TRIMS
1. Zipper: This is the one trim that you absolutely need; the rest of the trims are highly recommended, but you can get away without them if you prefer. You will need one separating jacket zipper, #5 teeth size. I recommend the YKK brand. The recommended length is 26" (66 cm) for sizes 0-6, 28" (71 cm) for sizes 8-18, or 30" (76 cm) for sizes 20-30. You may need another zipper length depending on your pattern height adjustments. Some testers used a 2-way zipper for added mobility through the hips while sitting and I think it's a great feature to add.
Here are a few recommended zipper sources: Wawak, Zipper Stop, Zipper and Thread.
2. 1/4" Twill Tape: 1 yd of 1/4" (0.6 cm) wide white twill tape for stabilizing the neckline.
3. Grommets: Four 1/4" (0.6 cm) or 5/16" (0.8 cm) grommets. Make sure you can fit a safety pin through your grommet. The smallest size I have found that can still fit a safety pin through are these Dritz 1/4" (called eyelets instead of grommets). I have also tried this set that comes with a cutter and 5 colors, but the grommets are really small and it's a struggle to get the safety pin through. However, I managed to make these work so I thought it would be worth mentioning. You will also need a hammer to set the grommets. If you prefer, you can sew buttonholes instead of grommets.
I keep a few other supplies on hand when setting grommets. You will need a hammer but the rest of these supplies are optional: Mini Mat & Cutter Set, Metal Block, Hammer and Small Scissors.
4. Safety pin: For threading drawstring. It should be small enough to fit through your grommets.
5. 3 1/2 yards of pre-made drawstring or cording. Or you can sew your own drawstrings using the main fabric. The Neckline length is 50" and the Hem length is 70".
So there you have it, all of the supplies you need to get started on your Joy! You can review the next post, which is all about custom adjustments, here, before cutting out your fabric.
Joy Jacket Sew Along
1 Sewing Supplies || 2 Pattern Adjustments || 3 Cutting and Applying Fusible || 4 Prepping Drawstrings & Pockets || 5 Assemble Outer Main Fabric || 6 Assemble Lining || 7 Assemble Facing & Attach to Lining || 8 Set Zipper & Add Grommets or Buttonholes || 9 Bagging Lining & Finishing Details
Gabriela